Android and Jenkins: What Is the Limit? Part Two.


I know it’s been over two years since the first article of this series, but hey, life happens! I’ve been juggling quite a few things that are more important for the Jenkins project. Let’s face it, nobody’s losing sleep over running Jenkins on Android. But hey, sometimes you just gotta indulge in a bit of tech whimsy, am I right?
So, here we are, diving back into this almost frivolous experiment to see just how far we can push the Jenkins-Android interaction. There are essentially two ways to stretch the boundaries with Jenkins and Android:
-
Building Android apps with Jenkins
-
Running Jenkins on an Android device
Now, the first option has already had its moment in the spotlight in another series of articles, so we’re turning our attention to the latter. Why, you might ask? Well, because why not? Because we’re tech enthusiasts, and if there’s a crazy idea floating around, we’re going to give it a try!
Setting up a Jenkins controller on Android
In the previous article, we already laid the groundwork for running a Jenkins agent on Android.
We installed Termux, OpenSSH, and Java on the Android device, and confirmed that the agent could be reached from a grown-up Jenkins controller.
We even got it to run a FreeStyle pipeline that spat out the result of the uname -a command.
Quite the achievement, huh?
For this experiment, we’re sticking with my old Redmi Note 7, still chugging along with Android 10. Now, keep in mind, this device got benched because it couldn’t keep up with my daily pace, so it’s not exactly a powerhouse for Jenkins. Sure, I could’ve slapped Linux on it instead, but where’s the fun in taking the easy route, right? Let’s see if we can kickstart a Jenkins controller on this bad boy!
Launching the controller via Java command
Now, I’ve dabbled with memory-constrained devices before, and I know a Jenkins controller can work with a measly 1GB of RAM. I have no clue how much of that sweet memory pie the Android system will serve up to Termux, or how much Termux will pass along to the JVM, but hey, let’s roll the dice! When I SSH in from my PC, here’s what I see:
☎  Jenkins@localhost:~ $free -h
               total        used        free      shared  buff/cache   available
Mem:           3.6Gi       2.1Gi        80Mi       3.0Mi       1.5Gi       1.3Gi
Swap:          2.2Gi       1.6Gi       623Mi
Looks like we’re sitting on a cozy 3.6GB of RAM, which should be just about enough to wrangle a Jenkins controller into submission.
Let’s fire it up using the trusty jenkins.war file, the lazy dev’s best friend!
But first, a quick pit stop to grab the latest LTS version of Jenkins.
The official documentation says it’s 2.504.1 at the time of writing, but, you know, details.
pkg install curlNow, with our newfound love for curl, let’s snag that jenkins.war file:
curl -L -O https://get.jenkins.io/war-stable/latest/jenkins.warThe next step is to grab a newer version of Java, as things have changed quite a lot since our first experiment!
pkg install fontconfig freetype openjdk-21 ttf-dejavuInstalling fonts with your JDK may feel like inviting a violinist to a rock concert — but Jenkins insists. Without them, it simply refuses to show up.
With the file safely in our grasp, it’s showtime! Let’s unleash Jenkins upon this unsuspecting Android device:
java -jar jenkins.warThe familiar lines start flowing:
☎ Jenkins@localhost:~$ java -jar jenkins.war
Running from: /data/data/com.termux/files/home/jenkins.war
webroot: /data/data/com.termux/files/home/.jenkins/war
2025-05-20 20:09:14.289+0000 [id=1] INFO winstone.Logger#logInternal: Beginning extraction from war file
2025-05-20 20:09:16.517+0000 [id=1] WARNING o.e.j.ee9.nested.ContextHandler#setContextPath: Empty contextPath
2025-05-20 20:09:16.697+0000 [id=1] INFO org.eclipse.jetty.server.Server#doStart: jetty-12.0.19; built: 2025-04-01T13:28:40.005Z; git: 23436cd577b4238238eb192683dfc2b1476c6b87; jvm 21.0.7
2025-05-20 20:09:18.588+0000 [id=1] INFO o.e.j.e.w.StandardDescriptorProcessor#visitServlet: NO JSP Support for /, did not find org.eclipse.jetty.ee9.jsp.JettyJspServlet
2025-05-20 20:09:18.752+0000 [id=1] INFO o.e.j.s.DefaultSessionIdManager#doStart: Session workerName=node0
2025-05-20 20:09:20.372+0000 [id=1] INFO hudson.WebAppMain#contextInitialized: Jenkins home directory: /data/data/com.termux/files/home/.jenkins found at: $user.home/.jenkins
2025-05-20 20:09:21.099+0000 [id=1] INFO o.e.j.s.handler.ContextHandler#doStart: Started oeje9n.ContextHandler$CoreContextHandler@1ff55ff{Jenkins v2.504.1,/,b=file:///data/data/com.termux/files/home/.jenkins/war/,a=AVAILABLE,h=oeje9n.ContextHandler$CoreContextHandler$CoreToNestedHandler@351f2244{STARTED}}
2025-05-20 20:09:21.133+0000 [id=1] INFO o.e.j.server.AbstractConnector#doStart: Started ServerConnector@38a1a26{HTTP/1.1, (http/1.1)}{0.0.0.0:8080}
2025-05-20 20:09:21.185+0000 [id=1] INFO org.eclipse.jetty.server.Server#doStart: Started oejs.Server@3b0c9195{STARTING}[12.0.19,sto=0] @9778ms
2025-05-20 20:09:21.189+0000 [id=37] INFO winstone.Logger#logInternal: Winstone Servlet Engine running: controlPort=disabled
2025-05-20 20:09:21.632+0000 [id=36] INFO jenkins.model.Jenkins#<init>: Starting version 2.504.1
2025-05-20 20:09:22.307+0000 [id=45] INFO jenkins.InitReactorRunner$1#onAttained: Started initialization
2025-05-20 20:09:22.408+0000 [id=52] INFO jenkins.InitReactorRunner$1#onAttained: Listed all plugins
2025-05-20 20:09:25.596+0000 [id=52] INFO jenkins.InitReactorRunner$1#onAttained: Prepared all plugins
2025-05-20 20:09:25.612+0000 [id=52] INFO jenkins.InitReactorRunner$1#onAttained: Started all plugins
2025-05-20 20:09:25.622+0000 [id=45] INFO jenkins.InitReactorRunner$1#onAttained: Augmented all extensions
2025-05-20 20:09:26.201+0000 [id=49] INFO jenkins.InitReactorRunner$1#onAttained: System config loaded
2025-05-20 20:09:26.204+0000 [id=56] INFO jenkins.InitReactorRunner$1#onAttained: System config adapted
2025-05-20 20:09:26.207+0000 [id=56] INFO jenkins.InitReactorRunner$1#onAttained: Loaded all jobs
2025-05-20 20:09:26.215+0000 [id=48] INFO jenkins.InitReactorRunner$1#onAttained: Configuration for all jobs updated
2025-05-20 20:09:26.312+0000 [id=72] INFO hudson.util.Retrier#start: Attempt #1 to do the action check updates server
2025-05-20 20:09:27.062+0000 [id=54] INFO jenkins.install.SetupWizard#init:
*************************************************************
*************************************************************
*************************************************************
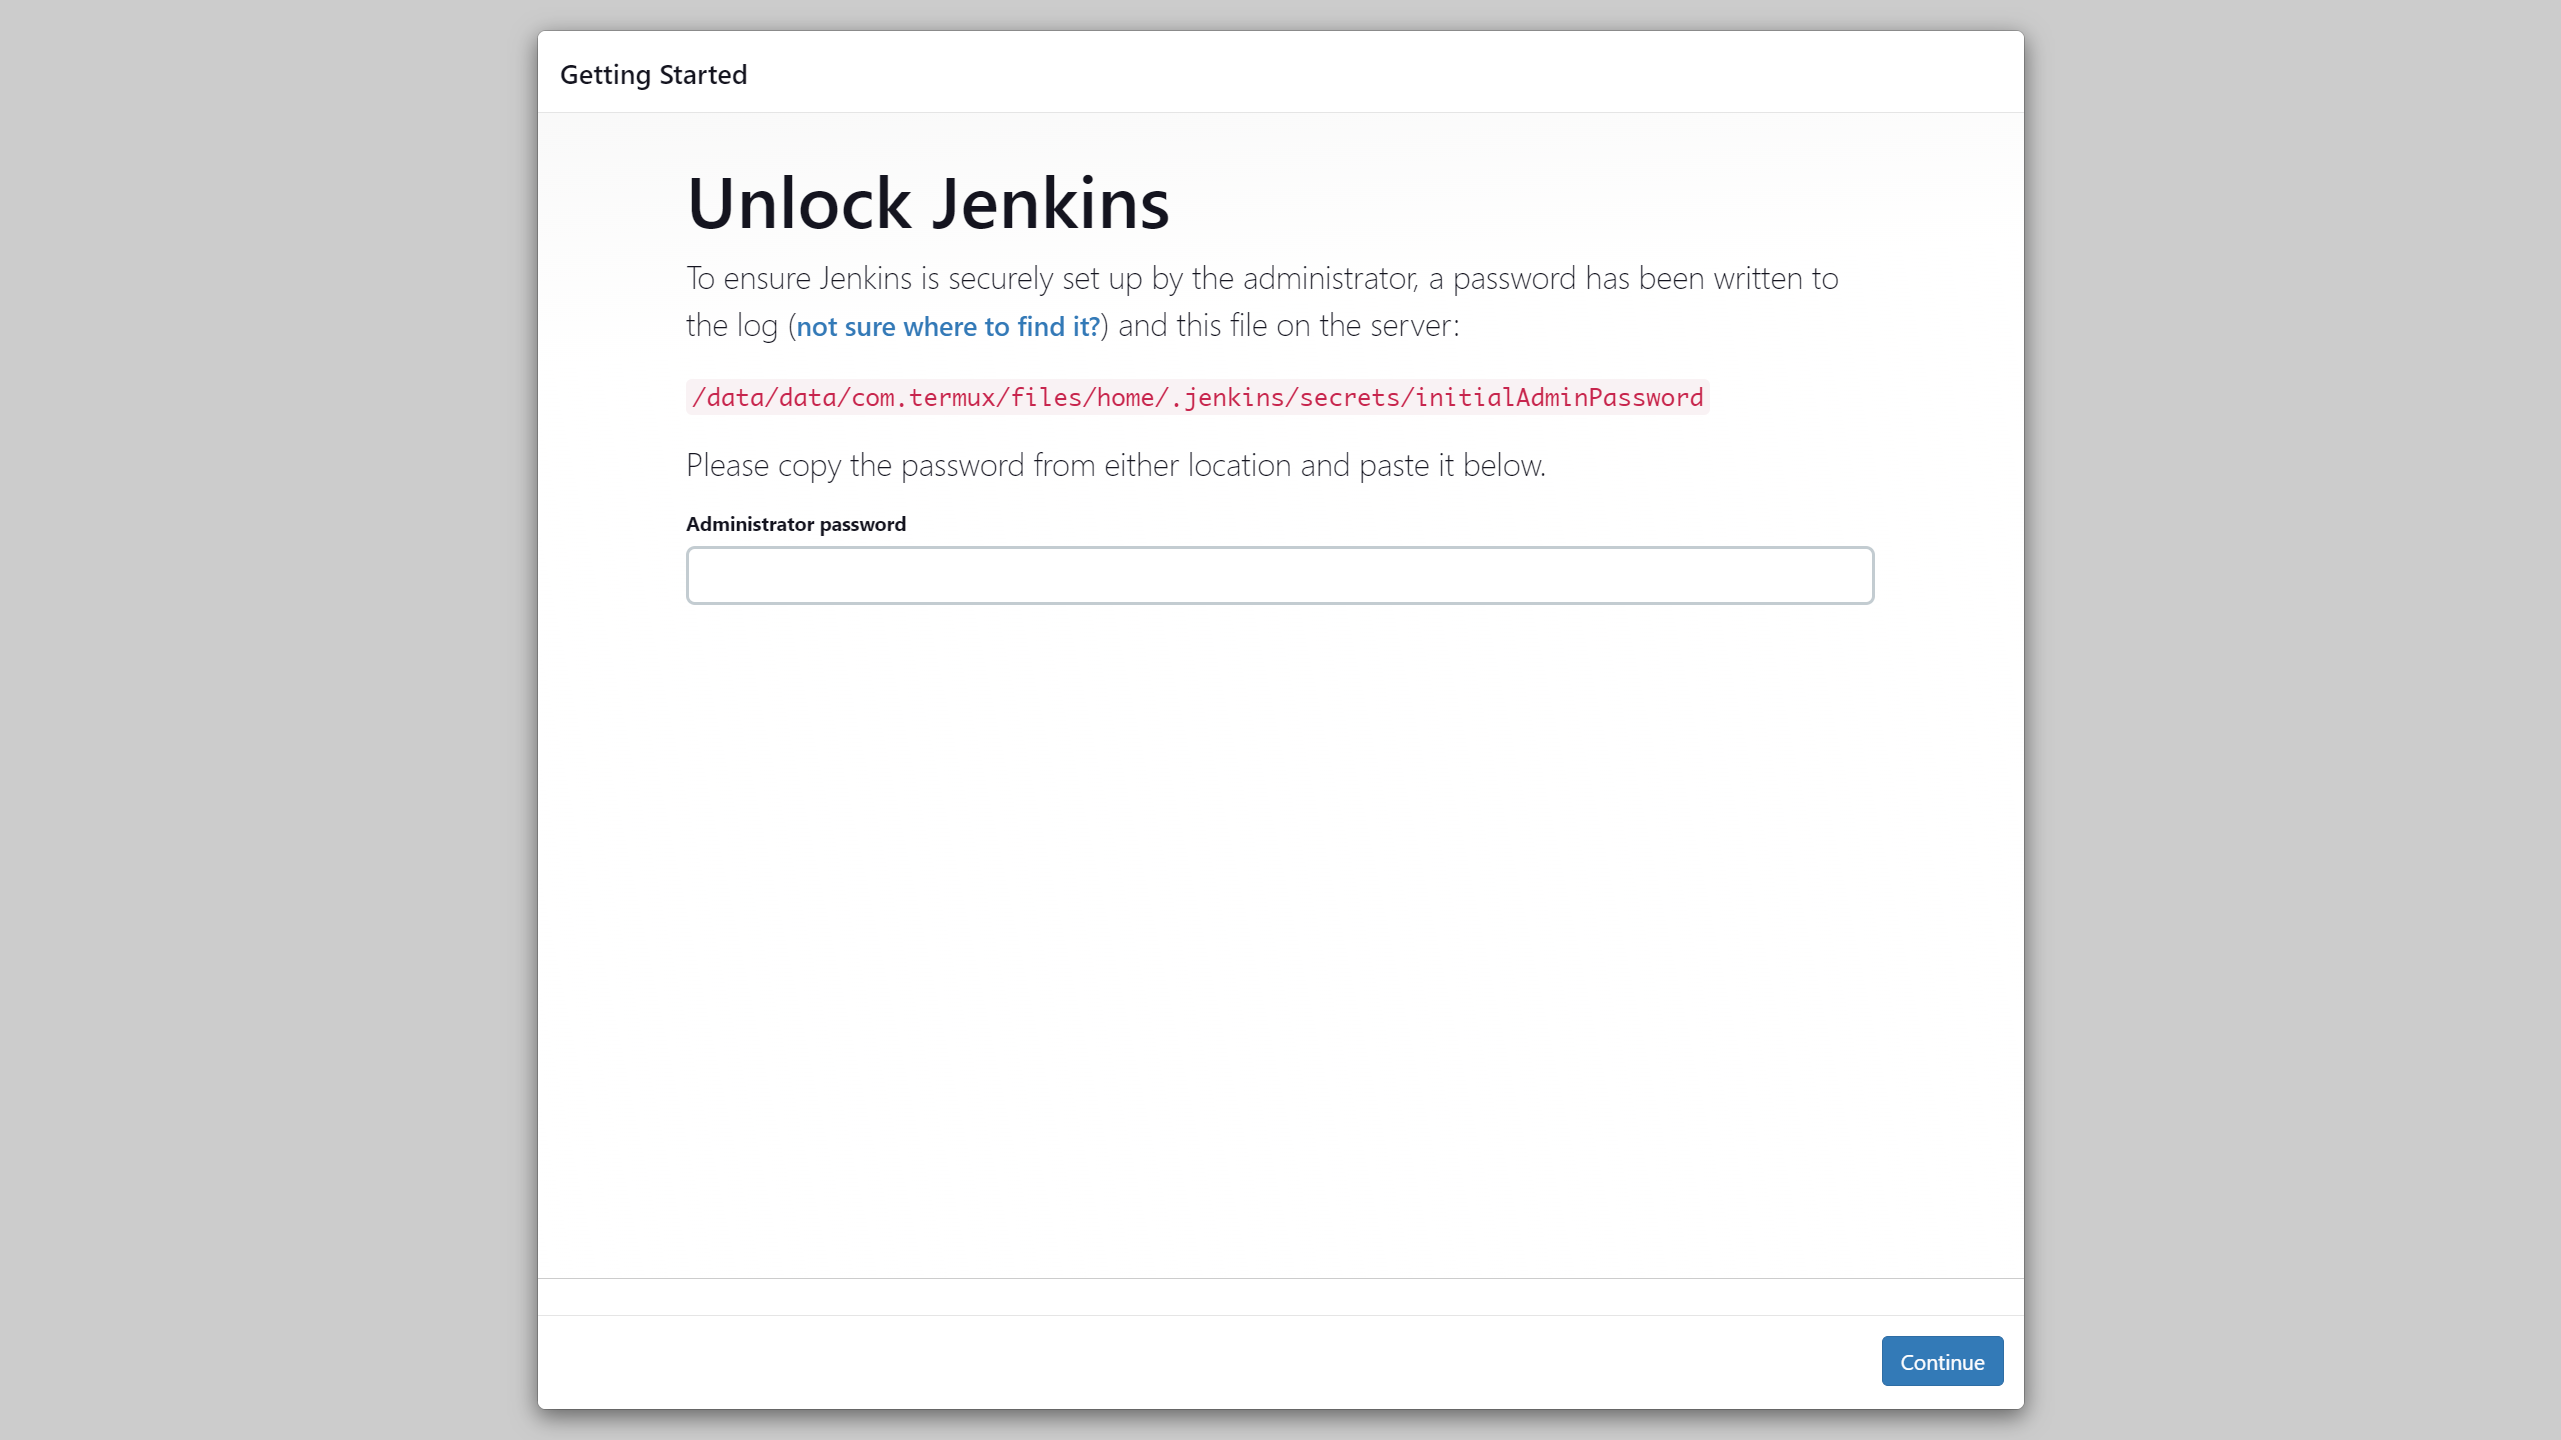
Jenkins initial setup is required. An admin user has been created and a password generated.
Please use the following password to proceed to installation:
a20b27ff6f684fa3bdf05d909e0bf1e4
This may also be found at: /data/data/com.termux/files/home/.jenkins/secrets/initialAdminPassword
*************************************************************The web page is also looking familiar, except for the path where the password is stored:
All seems well, until Jenkins throws a tantrum about the absence of a /tmp dir:
/tmp does not exist.Jenkins throws a fit when it can’t find /tmp.
We’ll avoid the drama by setting $PREFIX/tmp as its temp playground later on.
Minor hiccup aside, the installation chugs along smoothly, and the default plugins find their cozy little corner.
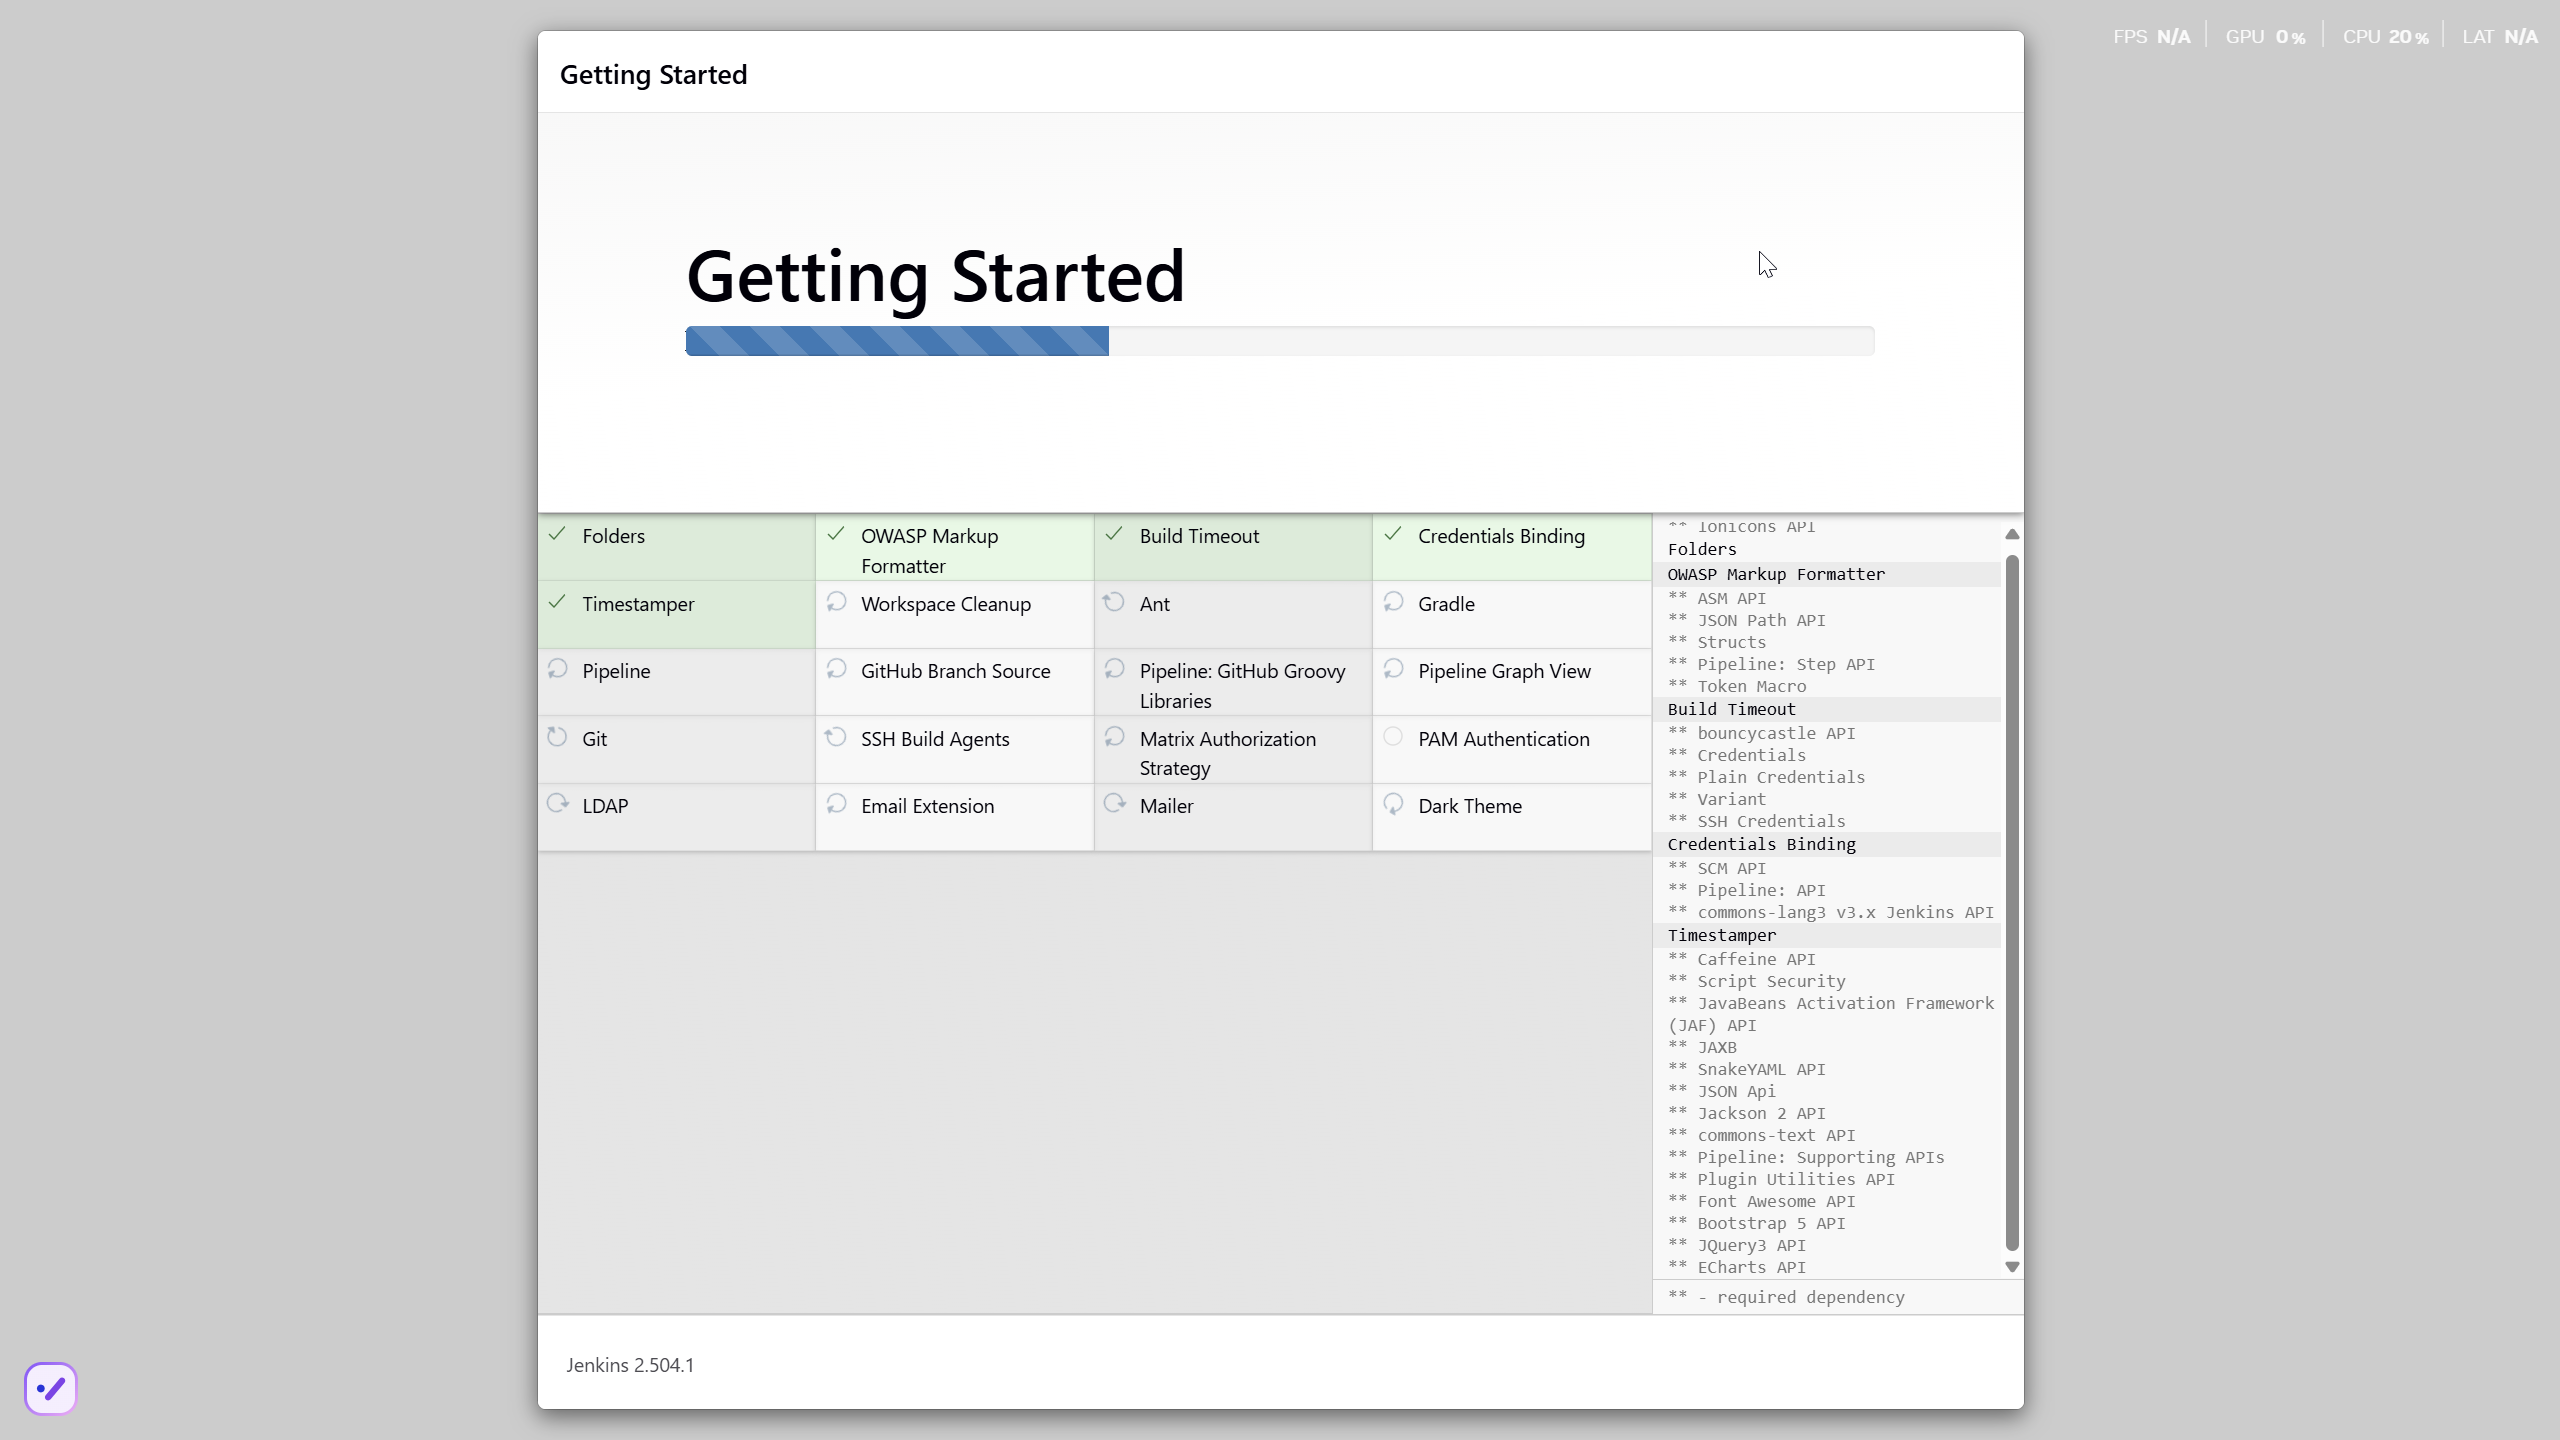
The journey nears its end, punctuated by the customary security warning about the use of the built-in node.
Nothing to do with Termux, but we’ll iron out the kinks later.
We’ll want to show off a bit later, so let’s get the Platform Labeler plugin ready. Go to "Manage Jenkins" > "Plugins" > "Available Plugins", search for it, check the box, and select the blue "Install" button. Yes, it’s that easy.
Now go back to your console, and Ctrl+C so you firmly ask Jenkins to shut down.
Quite the milestone, huh?
We’ve proven that we can kickstart a Jenkins controller using Termux on an Android device.
But hold onto your hats, folks!
We’re not done just yet.
Next up, we’ll ensure this Jenkins controller can strut its stuff as a service, and then, we’ll tweak it to kick off automatically at boot time.
What is a service, and why do we need it?
Now, we could just let Jenkins lurk in the shadows, but where’s the fun in that?
What if Android decides to play the ultimate prank and terminate Termux, or the device throws a fit and decides to reboot?
We’d be stuck manually resurrecting Jenkins every single time, and that’s just not the cricket we signed up for.
So, let’s give Jenkins a promotion, shall we? Time to turn it into a proper service!
The standard Jenkins installation migrated from init to systemd a while back.
Unfortunately, Termux isn’t in on the systemd party, so we’ll have to make do with the tools it offers.
Enter termux-services, a handy collection of scripts for service wrangling.
Instead of cluttering up ~/.bashrc or ~/.bash_profile, we can now start and stop services with a flick of the wrist, thanks to termux-services.
There’s already a smorgasbord of existing services ready to roll, and just like with systemd, there’s nothing stopping us from crafting a bespoke service for our beloved Jenkins.
To get termux-services up and running, execute:
pkg install termux-services runit
service-daemon start
Then, give Termux a gentle nudge so that the service-daemon springs to life.
exitNext up, to unleash the power of a service, fire off:
sv-enable <service>If you’re in the mood for a one-off joyride, a simple:
sv up <service>will suffice.
And when it’s time to hit the brakes, just tap into your inner traffic cop with:
sv down <service>Or, if you’re feeling particularly ruthless, disable it altogether:
sv-disable <service>A service is like a restless spirit shackled to this mortal realm if $PREFIX/var/service/<service>/down exists, so the sv-enable and sv-disable scripts play a little game of touch-and-go with this file.
Under the hood, termux-services taps into the mighty runit to reign in the chaos of services.
You’ll find a treasure trove of example scripts on the runit website.
If you spot a script you fancy, or if you’re feeling particularly creative, just follow these steps:
mkdir -p $PREFIX/var/service/<PKG>/log
ln -sf $PREFIX/share/termux-services/svlogger $PREFIX/var/service/<PKG>/log/run
Then, tuck your run script snugly into $PREFIX/var/service/<PKG>/run, making sure it’s ready for its close-up.
You can then run
sv up <PKG>to breathe life into your creation.
The log files for these services bask in the limelight at $PREFIX/var/log/sv/<PKG>/, with the star of the show bearing the name "current".
Turning Jenkins into a service for smooth sailing
Now that we’ve mastered the art of creating and deploying services with Termux, let’s give our Jenkins controller a promotion.
First up, we need to whip up a script to kickstart Jenkins as a service.
Let’s call it run and tuck it snugly into the $PREFIX/var/service/jenkins/ directory.
mkdir -p $PREFIX/var/service/jenkins
cd $PREFIX/var/service/jenkins
cat >> run <<EOF
#!$PREFIX/usr/bin/bash
JENKINS_LOG=/data/data/com.termux/files/home/.jenkins/logs/jenkins.log
$PREFIX/usr/bin/java -Djava.io.tmpdir=$PREFIX/tmp -jar $HOME/jenkins.war --logfile=${JENKINS_LOG}
EOF
chmod +x run
mkdir -p $HOME/.jenkins/logs
touch $HOME/.jenkins/logs/jenkins.log
With our script ready, let’s test if Jenkins plays nice as a service:
sv-enable jenkins
sv up jenkins
Time to peek under the hood and see if Jenkins is revving up by checking the logs:
tail -f $HOME/.jenkins/logs/jenkins.log&Voilà! Standard Jenkins logs, just like we’re accustomed to seeing on a run-of-the-mill server.
2025-05-18 14:13:27.380+0000 [id=1]     WARNING o.e.j.s.handler.ContextHandler#setContextPath: Empty contextPath
2025-05-18 14:13:27.446+0000 [id=1]     INFO    org.eclipse.jetty.server.Server#doStart: jetty-10.0.20; built: 2024-01-29T20:46:45.278Z; git: 3a745c71c23682146f262b99f4ddc4c1bc41630c; jvm 17-internal+0-adhoc..src
2025-05-18 14:13:27.727+0000 [id=1]     INFO    o.e.j.w.StandardDescriptorProcessor#visitServlet: NO JSP Support for /, did not find org.eclipse.jetty.jsp.JettyJspServlet
2025-05-18 14:13:27.780+0000 [id=1]     INFO    o.e.j.s.s.DefaultSessionIdManager#doStart: Session workerName=node0
2025-05-18 14:13:28.355+0000 [id=1]     INFO    hudson.WebAppMain#contextInitialized: Jenkins home directory: /data/data/com.termux/files/home/.jenkins found at: $user.home/.jenkins
2025-05-18 14:13:28.524+0000 [id=1]     INFO    o.e.j.s.handler.ContextHandler#doStart: Started w.@216914{Jenkins v2.504.1,/,file:///data/data/com.termux/files/home/.jenkins/war/,AVAILABLE}{/data/data/com.termux/files/home/.jenkins/war}
2025-05-18 14:13:28.538+0000 [id=1]     INFO    o.e.j.server.AbstractConnector#doStart: Started ServerConnector@395b56bb{HTTP/1.1, (http/1.1)}{0.0.0.0:8080}
2025-05-18 14:13:28.570+0000 [id=1]     INFO    org.eclipse.jetty.server.Server#doStart: Started Server@13f17eb4{STARTING}[10.0.20,sto=0] @2771ms
With Jenkins now up and about, you can access it at the port 8080 on your trusty Android device.
Ensuring availability from boot for uninterrupted service
We’ve hit two major milestones:
-
Getting a Jenkins controller up and running on an Android device.
-
Successfully running Jenkins as a service on the Android device whenever we fire up Termux.
Pretty cool, right?
But what if the device decides to throw a curveball and reboots?
I know, this whole experiment is just a tech whimsy, but let’s push the boundaries and see how far we can take it.
Frankly, even if I’m just treating this as a fun experiment, I’d rather not deal with the hassle of launching Termux every time I reboot the device.
So what’s the logical next step?
Adding the Jenkins service to the roster of auto-starting services when the device boots up.
Installation of Termux:Boot
First things first, let’s get our hands on the Termux:Boot add-on from F-Droid. Important note: Keep your installations of Termux and add-ons strictly from one source, either Google Play or F-Droid. Mixing them up can lead to compatibility issues due to different key-signing methods.
-
Install the Termux:Boot app.
-
Head over to your Android settings and give Termux and Termux:Boot the green light by turning off battery optimizations for these apps.
-
Give the Termux:Boot app a friendly tap to start it up. This ensures it gets the memo to kick into action at boot time.
-
Ready for some directory magic? Let’s create the
~/.termux/boot/directory: This is where you’ll stash all the scripts you want to fire up on boot.
mkdir -p ~/.termux/boot/
If you’ve got a bunch of scripts, fear not — they’ll line up and execute in a nice, orderly fashion.
Pro tip: Keep your device wide awake by running termux-wake-lock right off the bat.
For example, to kickstart an sshd server and keep your device bright-eyed and bushy-tailed at boot, craft a little script like this one at ~/.termux/boot/start-sshd:
#!/data/data/com.termux/files/usr/bin/sh
termux-wake-lock
sshd
Don’t you forget to make it executable:
chmod 755 ~/.termux/boot/start-sshdAnd if you’re itching to have Termux-services do their thing at boot time, simply throw in:
#!/data/data/com.termux/files/usr/bin/sh
termux-wake-lock
. $PREFIX/etc/profile
This nifty snippet will unleash all the services that are raring to go in termux-services.
Adding Jenkins to the list of services that start automatically
Now, let’s add Jenkins to the list of services that start automatically when the device boots up.
Craft a script named ~/.termux/boot/start-jenkins and give it the following content:
#!/data/data/com.termux/files/usr/bin/sh
termux-wake-lock
sv up jenkins
Without chmod +x, your start-jenkins script is just a very well-written suggestion.
Run it, or Jenkins won’t be there when you reboot.
chmod 755 $HOME/.termux/boot/start-jenkinsAnd there you have it! Jenkins is now part of the elite club of services that kick off automatically when the device boots up. Now, you can rest easy knowing that your Jenkins controller will be up and running, ready to tackle any task you throw its way.
Checking Jenkins' boot-up performance
To ensure that Jenkins is indeed strutting its stuff when the device boots up, let’s put it to the test — give that device a good old reboot.
But before you hit that restart button, make sure you’ve given termux-boot a hearty handshake at least once and sorted out all the necessary permissions.
That means letting it run in the background and disabling battery optimization.
And if you’re rocking a phone with MIUI, well, hold onto your hats — you might need to do a little extra dance to get things grooving smoothly.
Head on over to the settings, and summon the magic word "background".
Hunt down an item called "Background autostart" and flip the switch for termux-boot and termux.
Et voilà! You’ve just unleashed the boot-time prowess of termux on MIUI.
Adding a Jenkins agent on Android
So, Jenkins on Android is strutting its stuff, but it’s throwing a fit about missing its sidekick, the agent.
Can’t have Jenkins sulking; let’s get that agent up and running on Android, shall we?

Establishing SSH connection for agent integration.
Remember when we conjured up an SSH key pair for our Android device?
Well, we’re going to do it again for the agent.
Time to add the public key to the ~/.ssh/authorized_keys file on the Android device.
Get ready to unleash some command-line magic:
☎  Jenkins@localhost:~ $ssh-keygen -t rsa -b 4096 -C "jenkins-agent"
Enter file in which to save the key (/data/data/com.termux/files/home/.ssh/id_rsa):
Enter passphrase (empty for no passphrase):
Enter same passphrase again:
Your identification has been saved in /data/data/com.termux/files/home/.ssh/id_rsa
Your public key has been saved in /data/data/com.termux/files/home/.ssh/id_rsa.pub
The key fingerprint is:
SHA256:rpaD/RohRXJsXAYTOahQWpIsih9vhzgl7G9PO23MujI jenkins-agent
The key's randomart image is:
+---[RSA 4096]----+
|ooo .+*=o        |
|+=  .+*o         |
|=o . ...         |
|o = ..           |
| o *... S        |
|  = +..o         |
|   + +o=.        |
|    E.*+=        |
|   . =BO.        |
+----[SHA256]-----+
☎  Jenkins@localhost:~ $cat ~/.ssh/id_rsa.pub
ssh-rsa AAAAB3NzaC1yc2EAAAADAQABAAACAQCb+j8eUrnWLh4DWSY8C9t5iNa9AtcIn2oShDUi4ATLKcyPINAmCcDVw19uzhFd+J836iKEFScx9Qw7zuv9iNWEjxEERXyFHXt8A9lMf78aeK4dvDei60JEN5+28YO7ctlQ39+wzHXIMtrFiBTeIFpIjPqM1EskKqTq8ySty+TrozCySXnFgbceP9NN+KZSzqyoYpjgMgYVtUTMSbnggFuWxfQms9a7tBLqv2GJzLoYJnWajXtrRokctQ/JyRFCZND7zhCF4cjyoI505tRgBUp7E3KV7CYiETV+7gQ92dV7K9Lf0u0OVQ== jenkins-agent
To add the generated public key to the authorized keys file, we can use the cat command to append the public key to the ~/.ssh/authorized_keys file.
Here’s how we can do it:
cat ~/.ssh/id_rsa.pub >> ~/.ssh/authorized_keysThis command will add the contents of the id_rsa.pub file (which is our public key) to the authorized_keys file.
If the authorized_keys file doesn’t exist, no worries – it’ll be conjured into existence for us.
Now, before we get too carried away with our newfound access, let’s ensure our digital fortress is properly fortified.
The ~/.ssh directory should flaunt permissions worthy of a royal decree: 700 (drwx------).
Meanwhile, the authorized_keys file should be wrapped in the impenetrable cloak of 600 (-rw-------) permissions.
If you’re feeling particularly wizardly, you can set these permissions using the chmod command:
chmod 700 ~/.ssh
chmod 600 ~/.ssh/authorized_keys
Let’s infuse this with a touch of levity:
If you’re still getting the password runaround when attempting to connect, there’s a chance our SSH server isn’t keen on our public key party trick.
Time to play detective!
Navigate to the $PREFIX/etc/ssh/sshd_config file and make sure it hasn’t ghosted us.
Look for a line that reads like the magic incantation we need:
PubkeyAuthentication yesIf you’ve been tinkering with the sshd_config file, remember to give the SSH service a friendly nudge to let it know about the changes.
Now that we’ve got the key to the kingdom, it’s time to set up a VIP pass for Jenkins.
Take a stroll over to the Jenkins controller and swing by "Manage Jenkins" > "Credentials" > "System". Next, hover over "Global credentials (unrestricted)" like a champ, select the down arrow, and select "Add Credentials".
Now, choose "SSH Username with private key" as the type of credential, and let’s fill in the details:
-
Username:
<your termux user name> -
Private Key: Enter directly, and paste the content of the private key file
~/.ssh/id_rsa. -
Passphrase: Leave it empty.
-
ID:
jenkins-agent -
Description:
Jenkins Agent SSH Key
Select the white on blue "Create" button, and voilà! You should now be the proud owner of a brand spanking new credential named "jenkins-agent". Jenkins is now armed with this secret handshake to chat with the Android device (which, let’s be honest, is basically chatting with itself).
Configuring the agent to communicate with the controller
Alright, back in the driver’s seat at "Manage Jenkins", let’s give that shiny blue "Set up agent" button a good ol' click and dive into the adventure!
Time to give our agent a name – I went with Myself because, well, it’s cozy in here with the Android machine.
Select "Permanent Agent" as the mode.
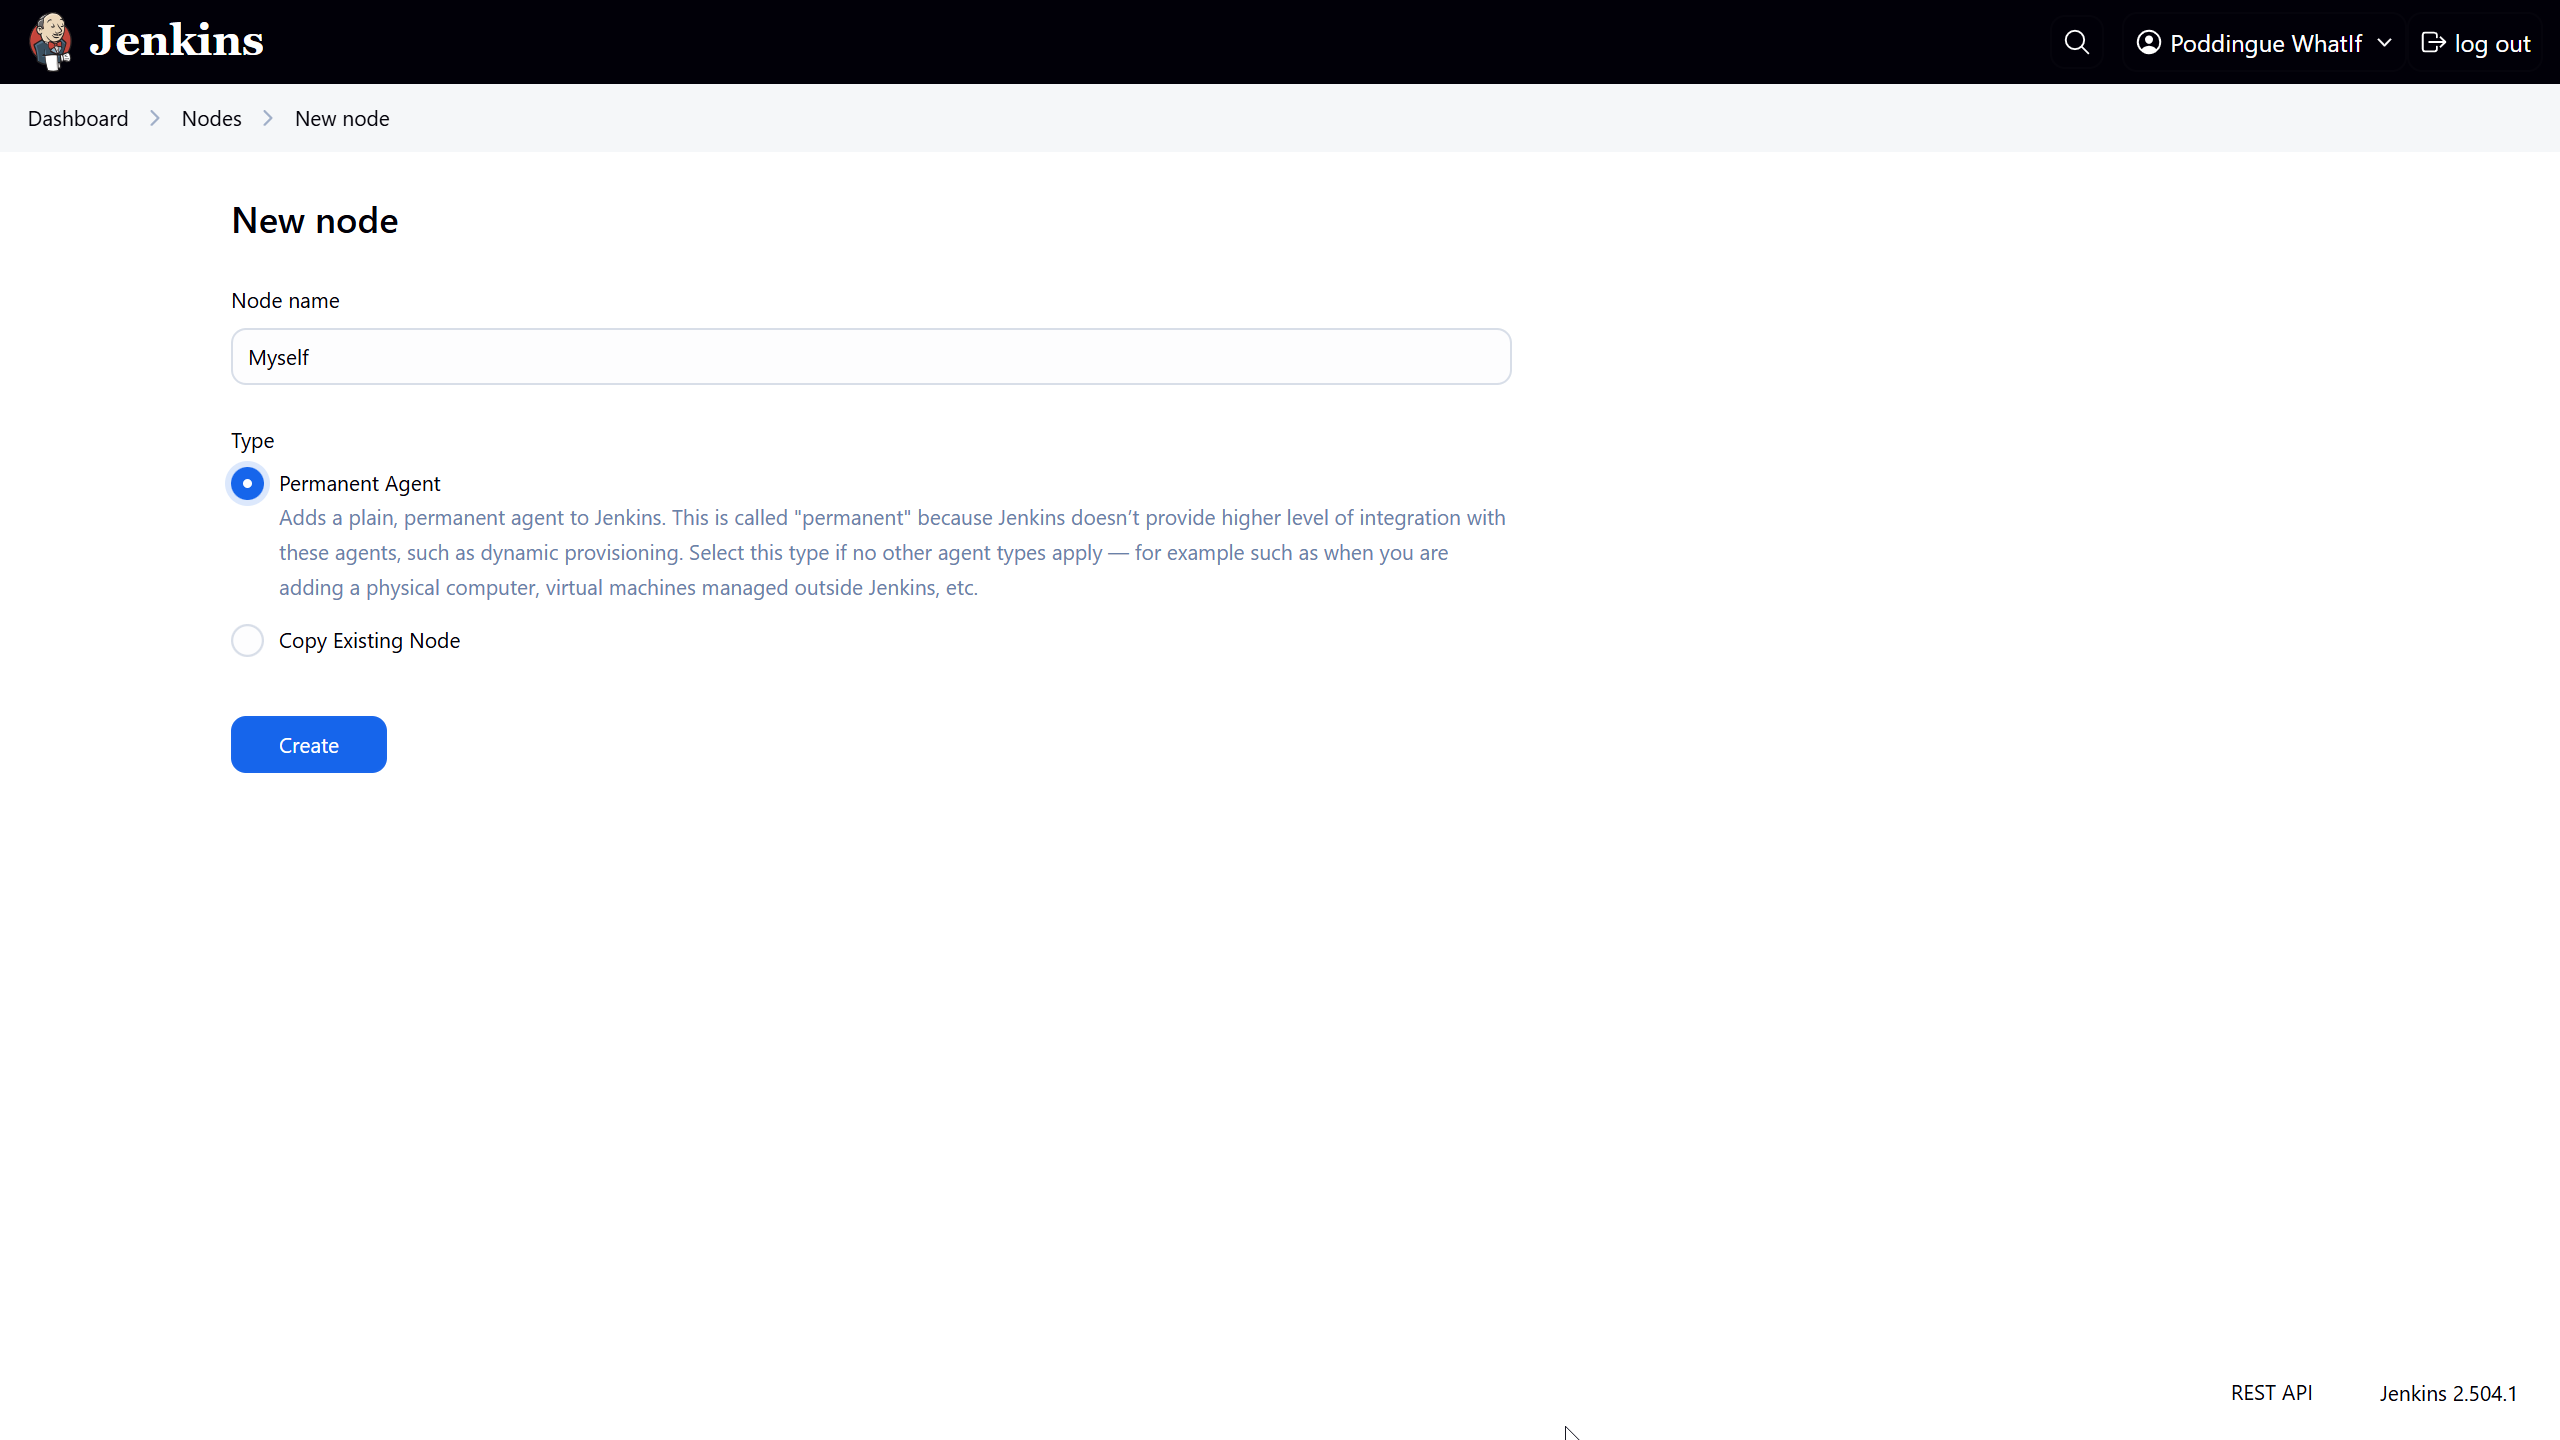
Now, hit "Create". You should now see a gazillion fields to fill in.
For the description, I went with something like The smartphone itself because, why not?
For the number of executors, I settled on 1, but feel free to tweak it based on your machine’s prowess.
The remote root directory is set to /data/data/com.termux/files/home – that’s our agent’s humble abode, the Termux user’s home turf.
As for labels, I went with aarch64, android – gotta give our Android buddy some identity, right?
And for usage, let’s go with "Use this node as much as possible" – it’s eager to help!
Now, for the grand finale, choose "Launch agent via SSH" as the launch method.
Host?
Oh, just good ol' localhost, and for credentials, select our trusty jenkins-agent from earlier.
Oh, but wait!
Before we select that final "Save" button, we’re diving into the "Advanced" settings because, well, we’re adventurers!
Change the port to 8022 and remember to update the "JavaPath" to /data/data/com.termux/files/usr/bin/java.
Lastly, sprinkle in some digits – 60 for "Connection Timeout in Seconds", 10 for "Maximum Number of Retries", and 10 for "Seconds To Wait Between Retries".
Then, with a dramatic flourish, select "Save" and let the magic unfold!
After a bit of anticipation, select "Nodes" on the left, select "Myself", and give that "Log" button a tap and voilà! You should see something like this:
Remoting version: 3301.v4363ddcca_4e7
Launcher: SSHLauncher
Communication Protocol: Standard in/out
This is a Unix agent
Agent successfully connected and online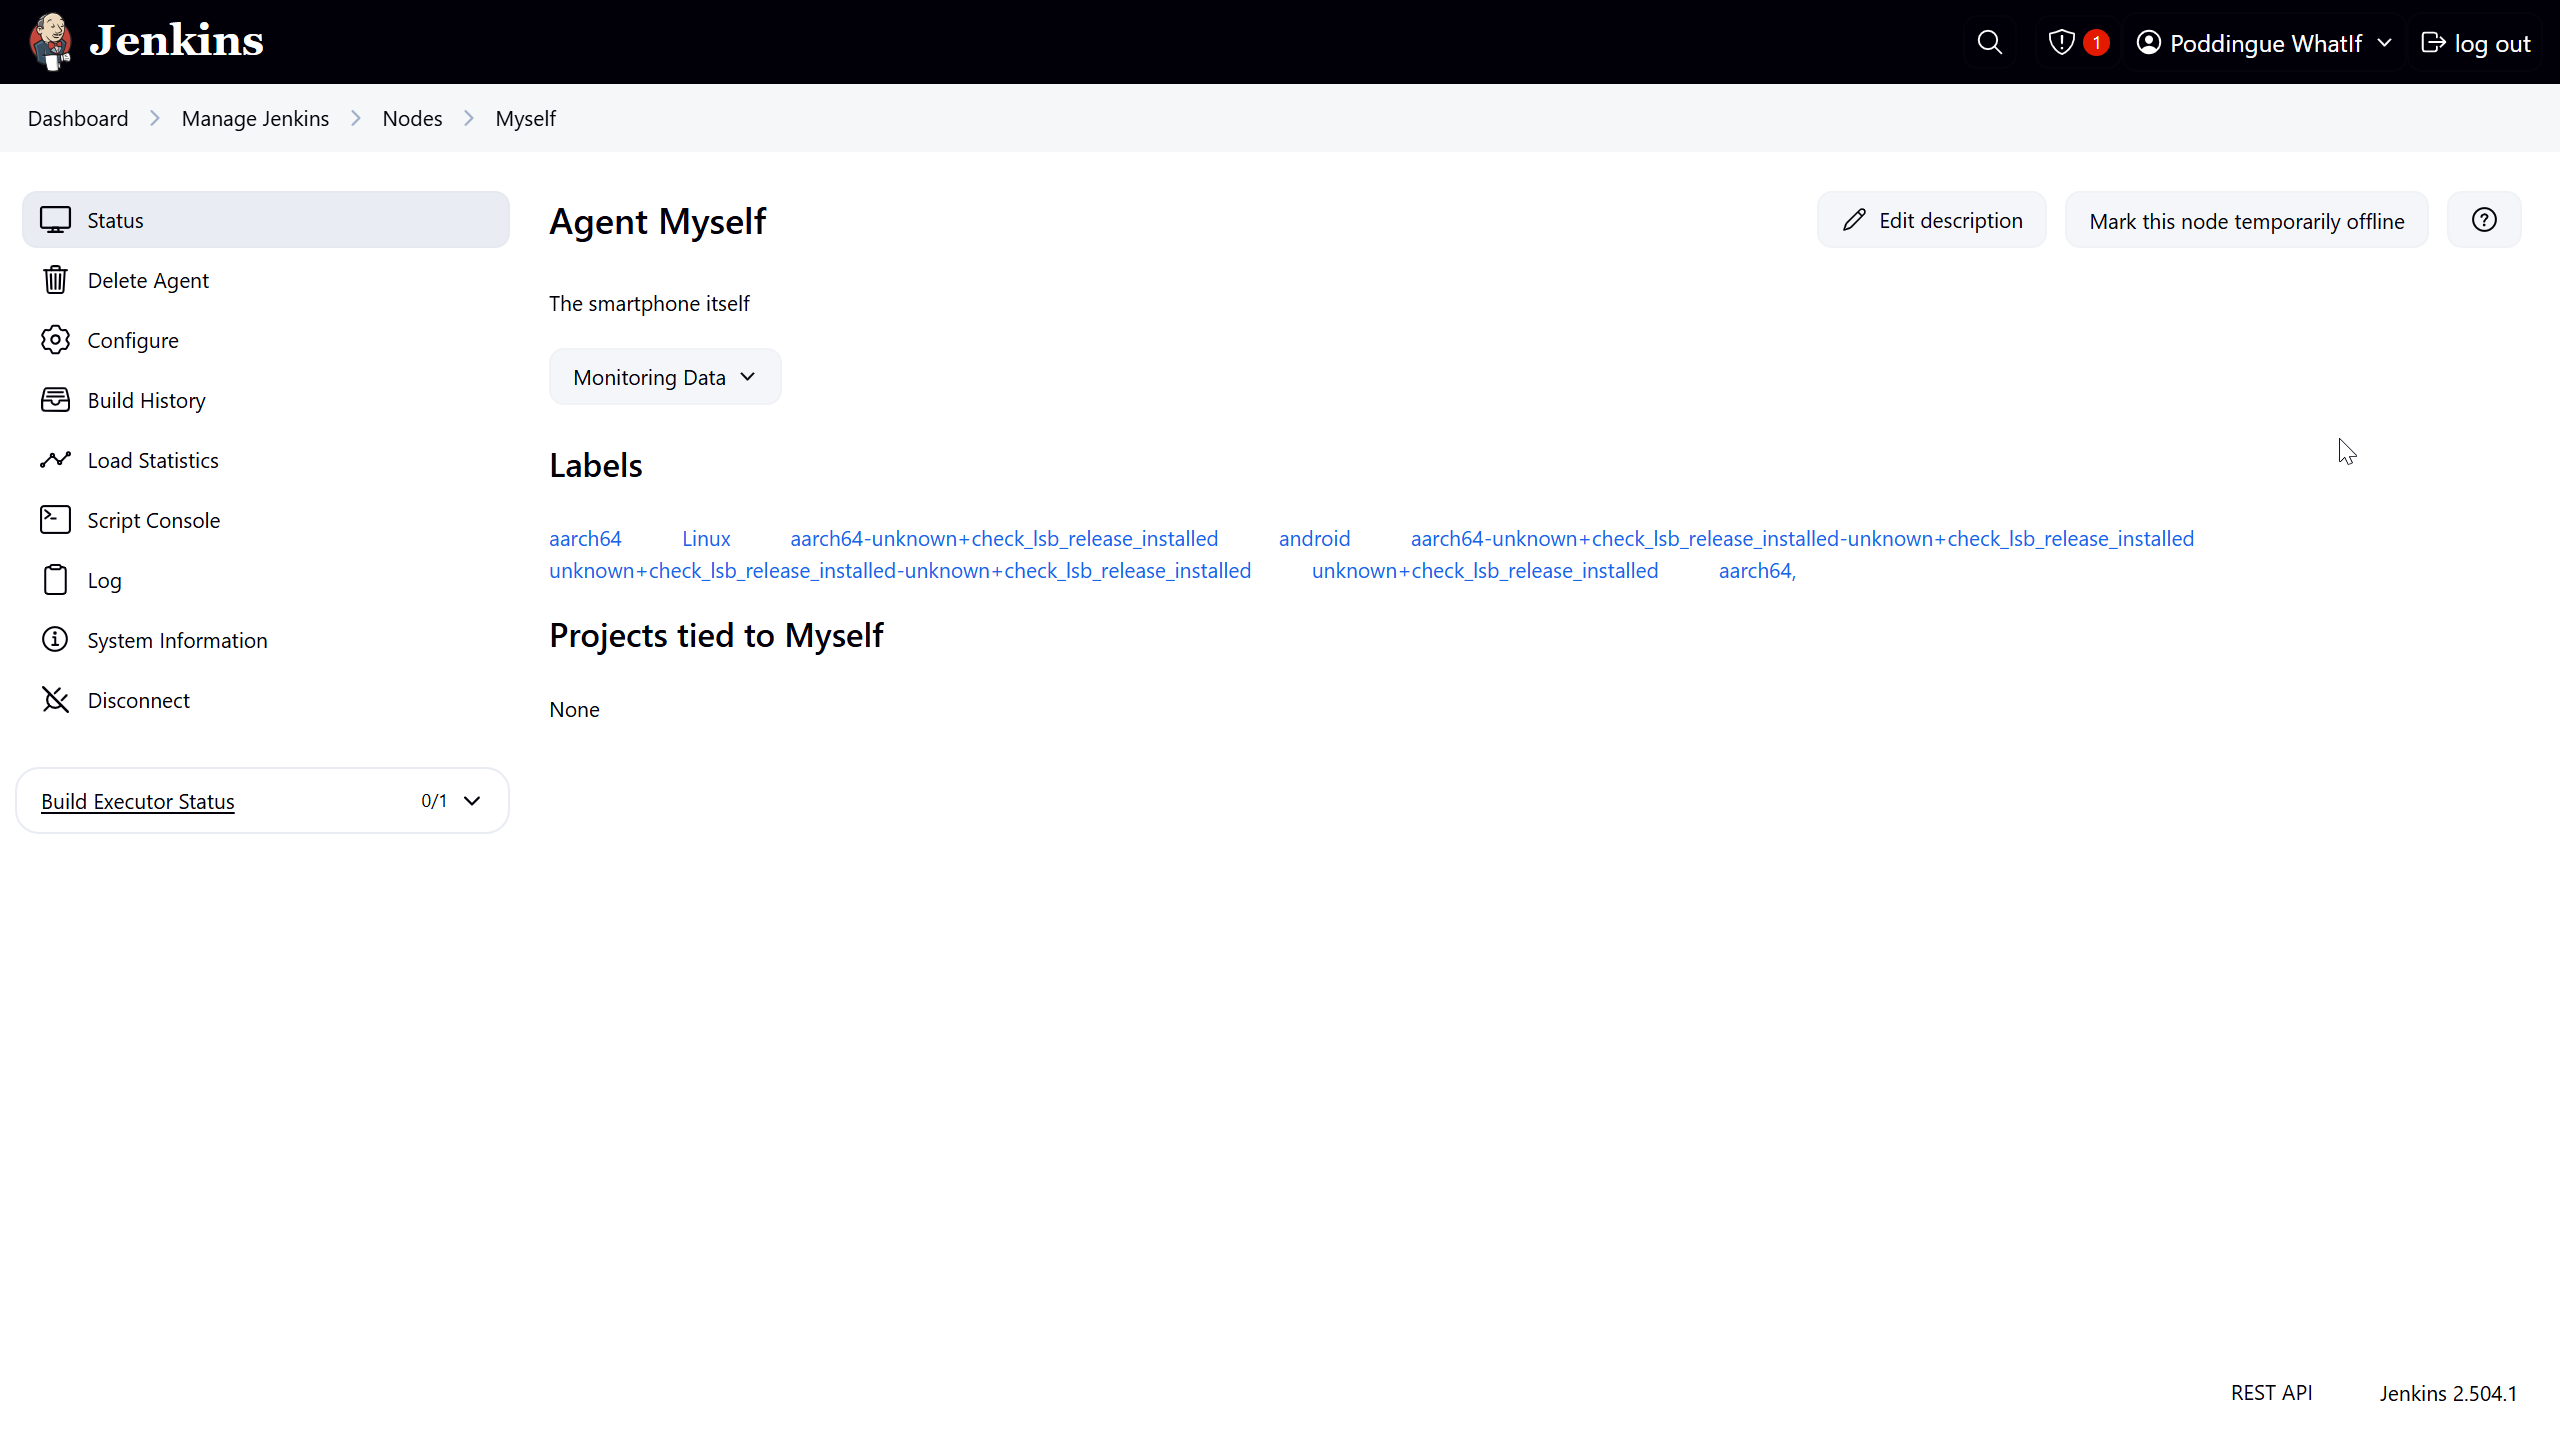
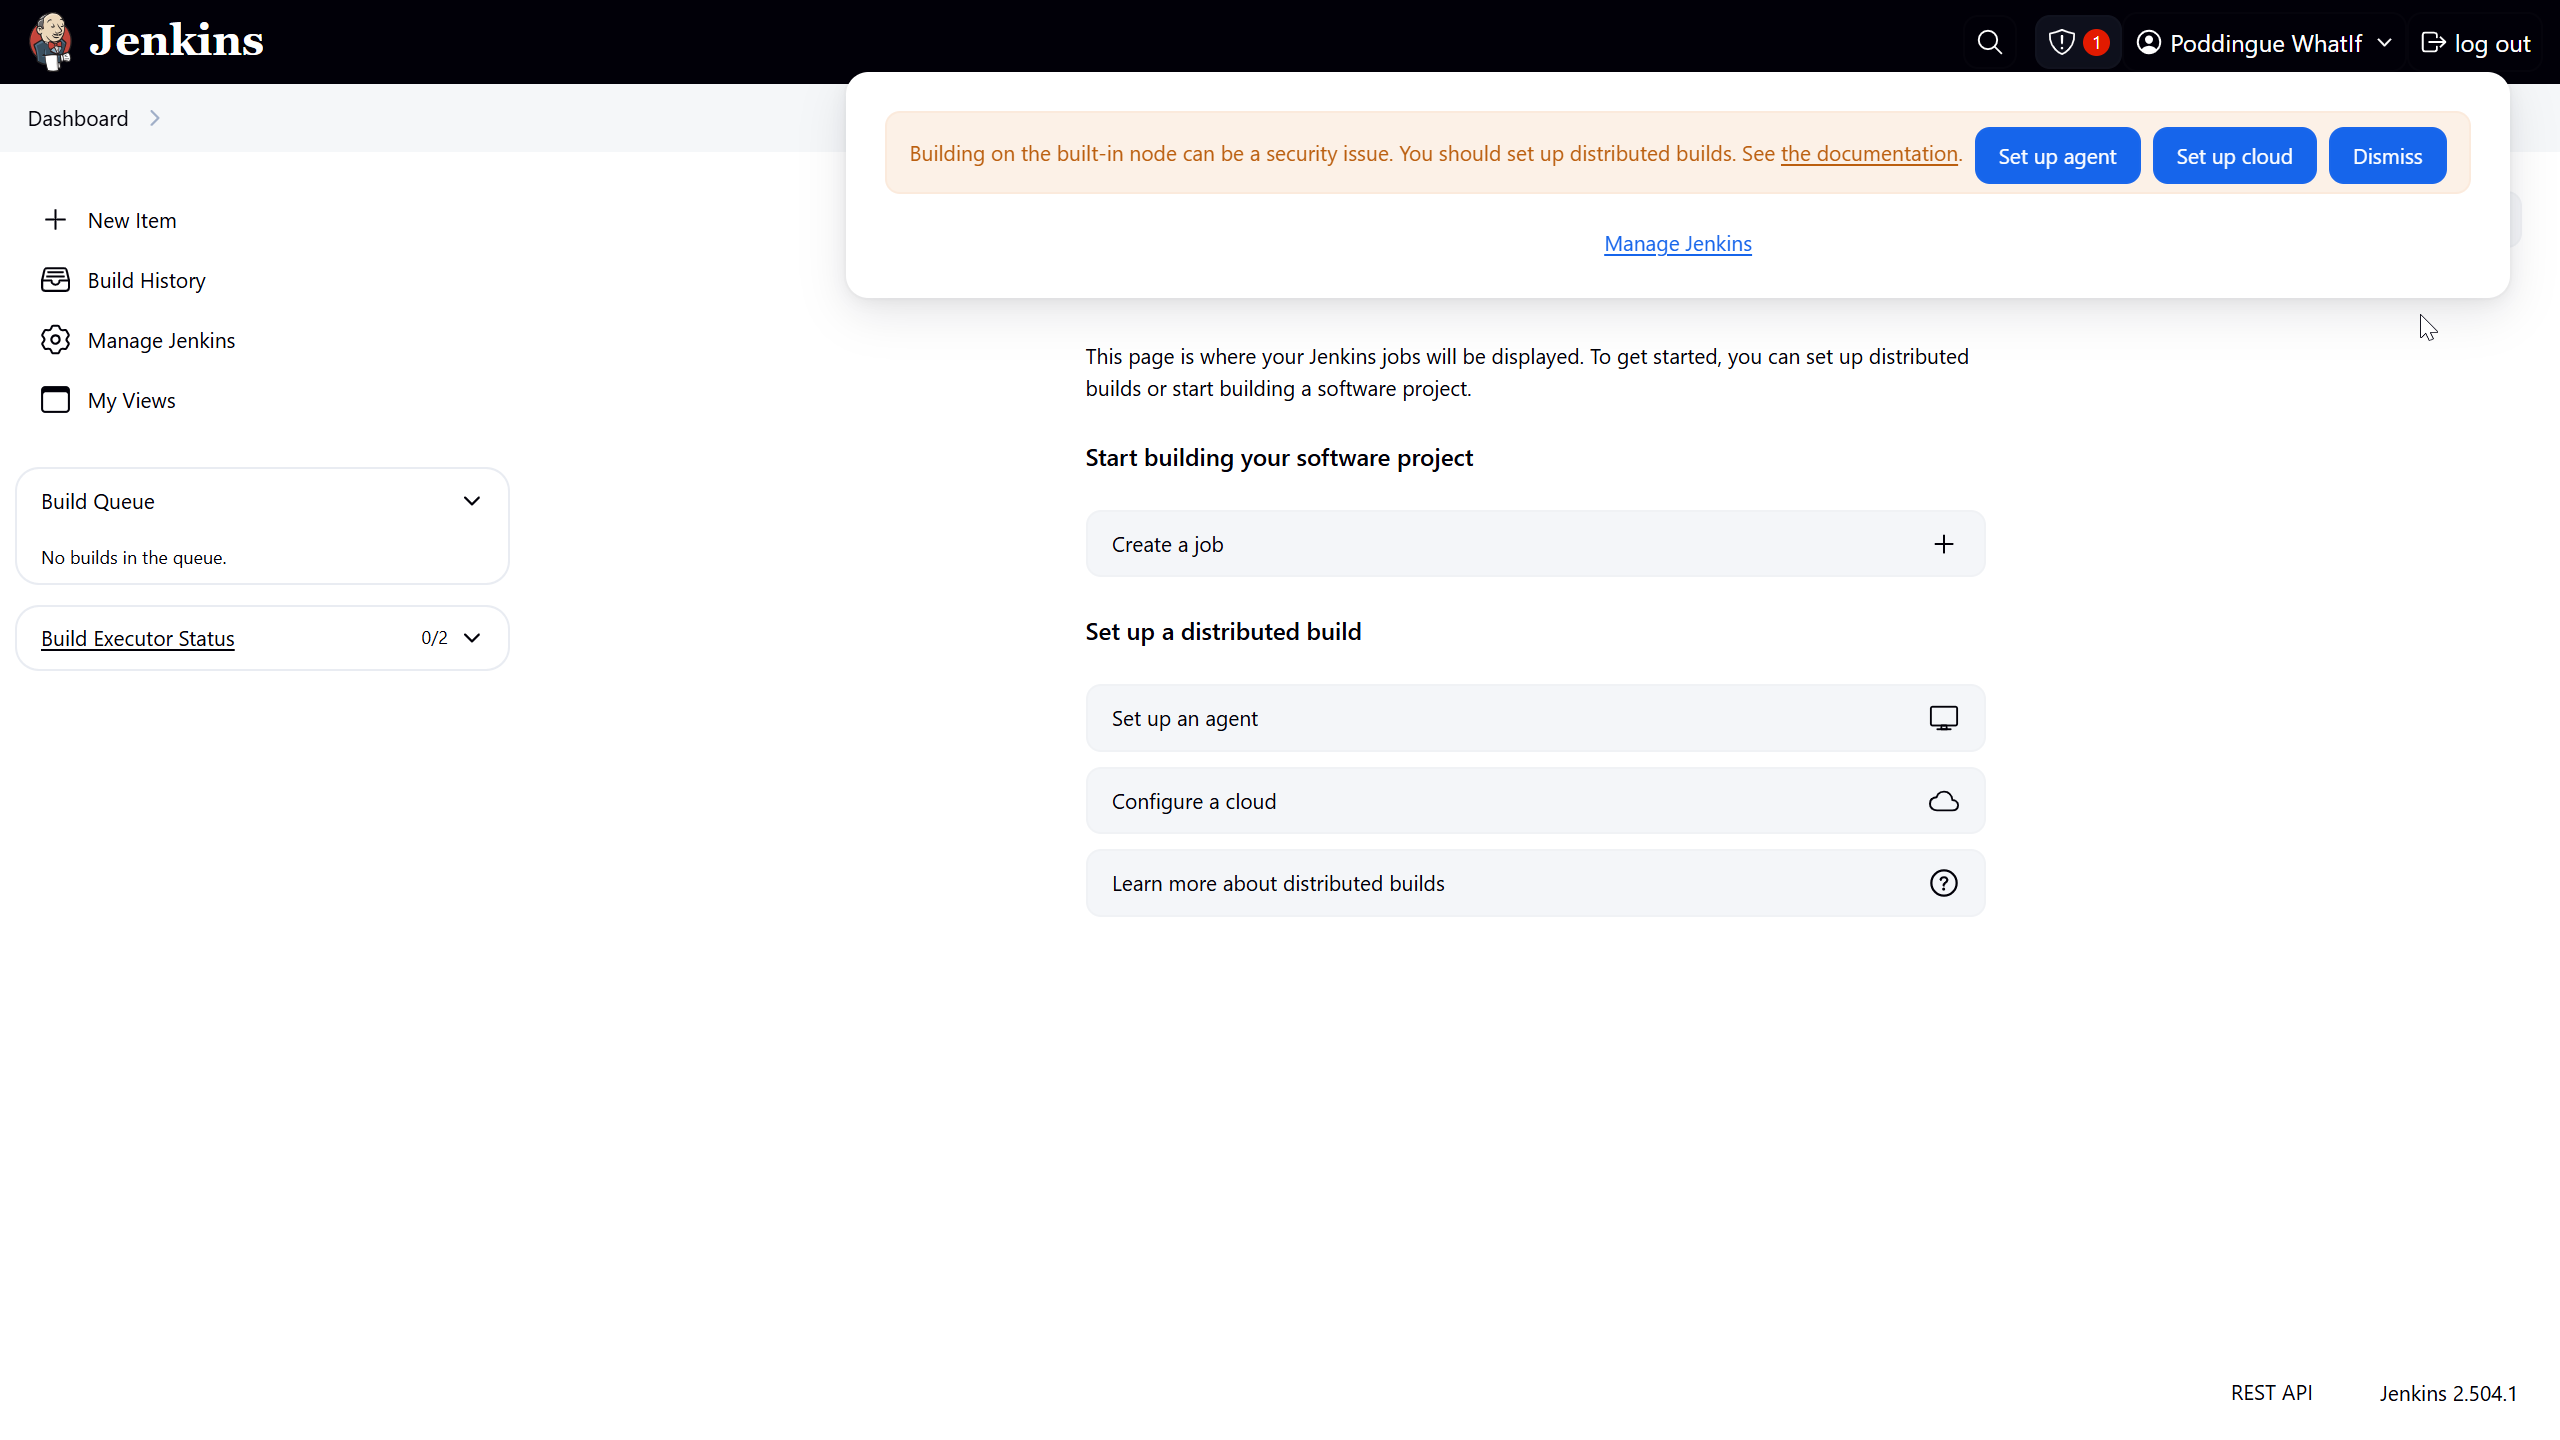
As you can see, the agent is connected, despite being on the same machine as the controller and running on top of Android.
Now, you can use this agent to run your builds on the Android device itself.
But… there is still a problem with our configuration and we have some ameliorations to make.
On the top right, you can still see a red warning:
Building on the built-in node can be a security issue. You should set the number of executors on the built-in node to 0.
We’ll have to address this issue.
Cleaning up the configuration
Alright, time to tackle that pesky security issue!
Hop on over to "Manage Jenkins" > "Nodes", and give a friendly selection to "Built-in Node".
Once there, mosey on over to the left and hit up "Configure". Now, set the number of executors to a solid 0.
Then, seal the deal with a satisfying selection of "Save".
Voilà! Watch that red warning vanish into thin air like it’s pulling a magic act!
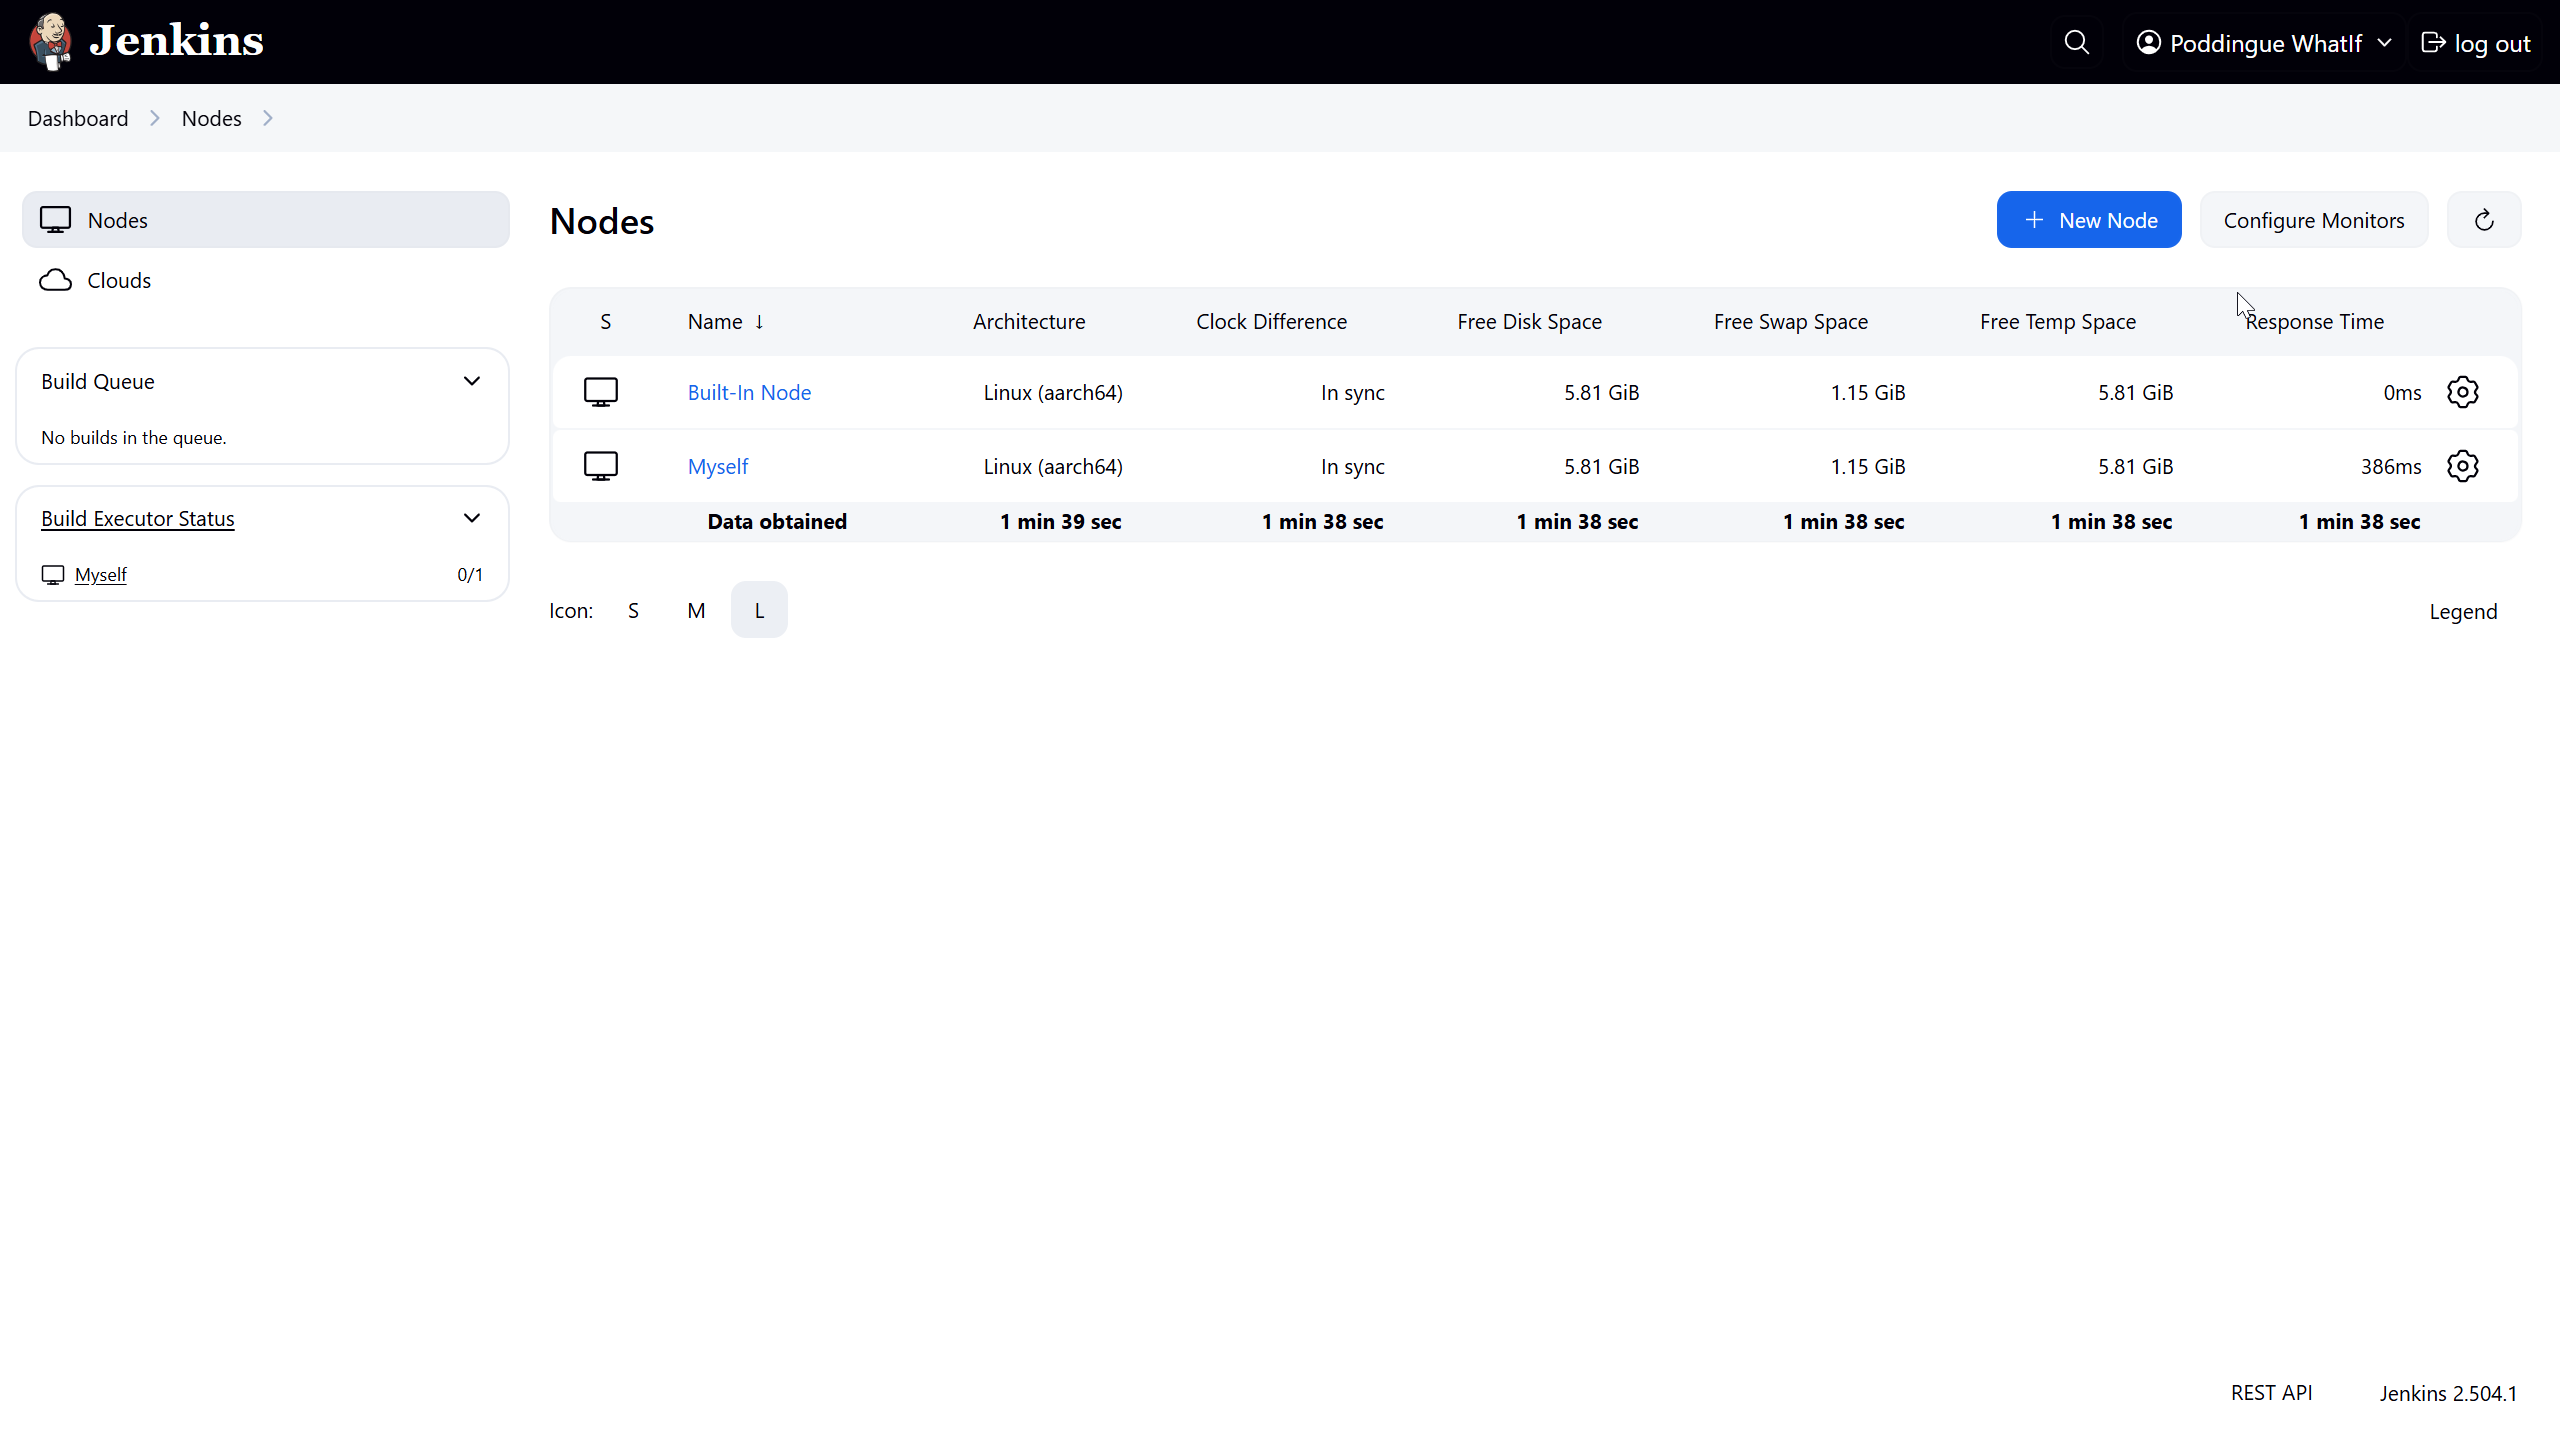
We’ve officially squashed that security bug and are all set to strut our stuff with our agent, free from any worries.
Creating a Pipeline from a GitHub repo
Now that Jenkins is up and running, let’s make it earn its keep. Think of Jenkins as your no-nonsense assistant — not much for small talk, but always ready to fetch your code and run your builds.
We’re going to create a new pipeline job via the classic UI, connect it to a GitHub repo, and have Jenkins fetch and build your code whenever you push changes. Automation magic? Absolutely. Sorcery? Maybe just a little.
Installing the necessary prerequisites
Your butler won’t lift a finger until the pantry is stocked. Let’s install the bare essentials:
pkg install git mavenSetting Up the Jenkins Pipeline
Let’s convince Jenkins to do our bidding.
From the dashboard:
-
Select New Item
-
Name it something like
my-awesome-pipeline(creativity optional) -
Select Pipeline as the type
-
Select OK
Now scroll to the Pipeline section and decide your scripting fate: Inline script, or Jenkinsfile from SCM.
Option 1: Inline (Scripted) Pipeline
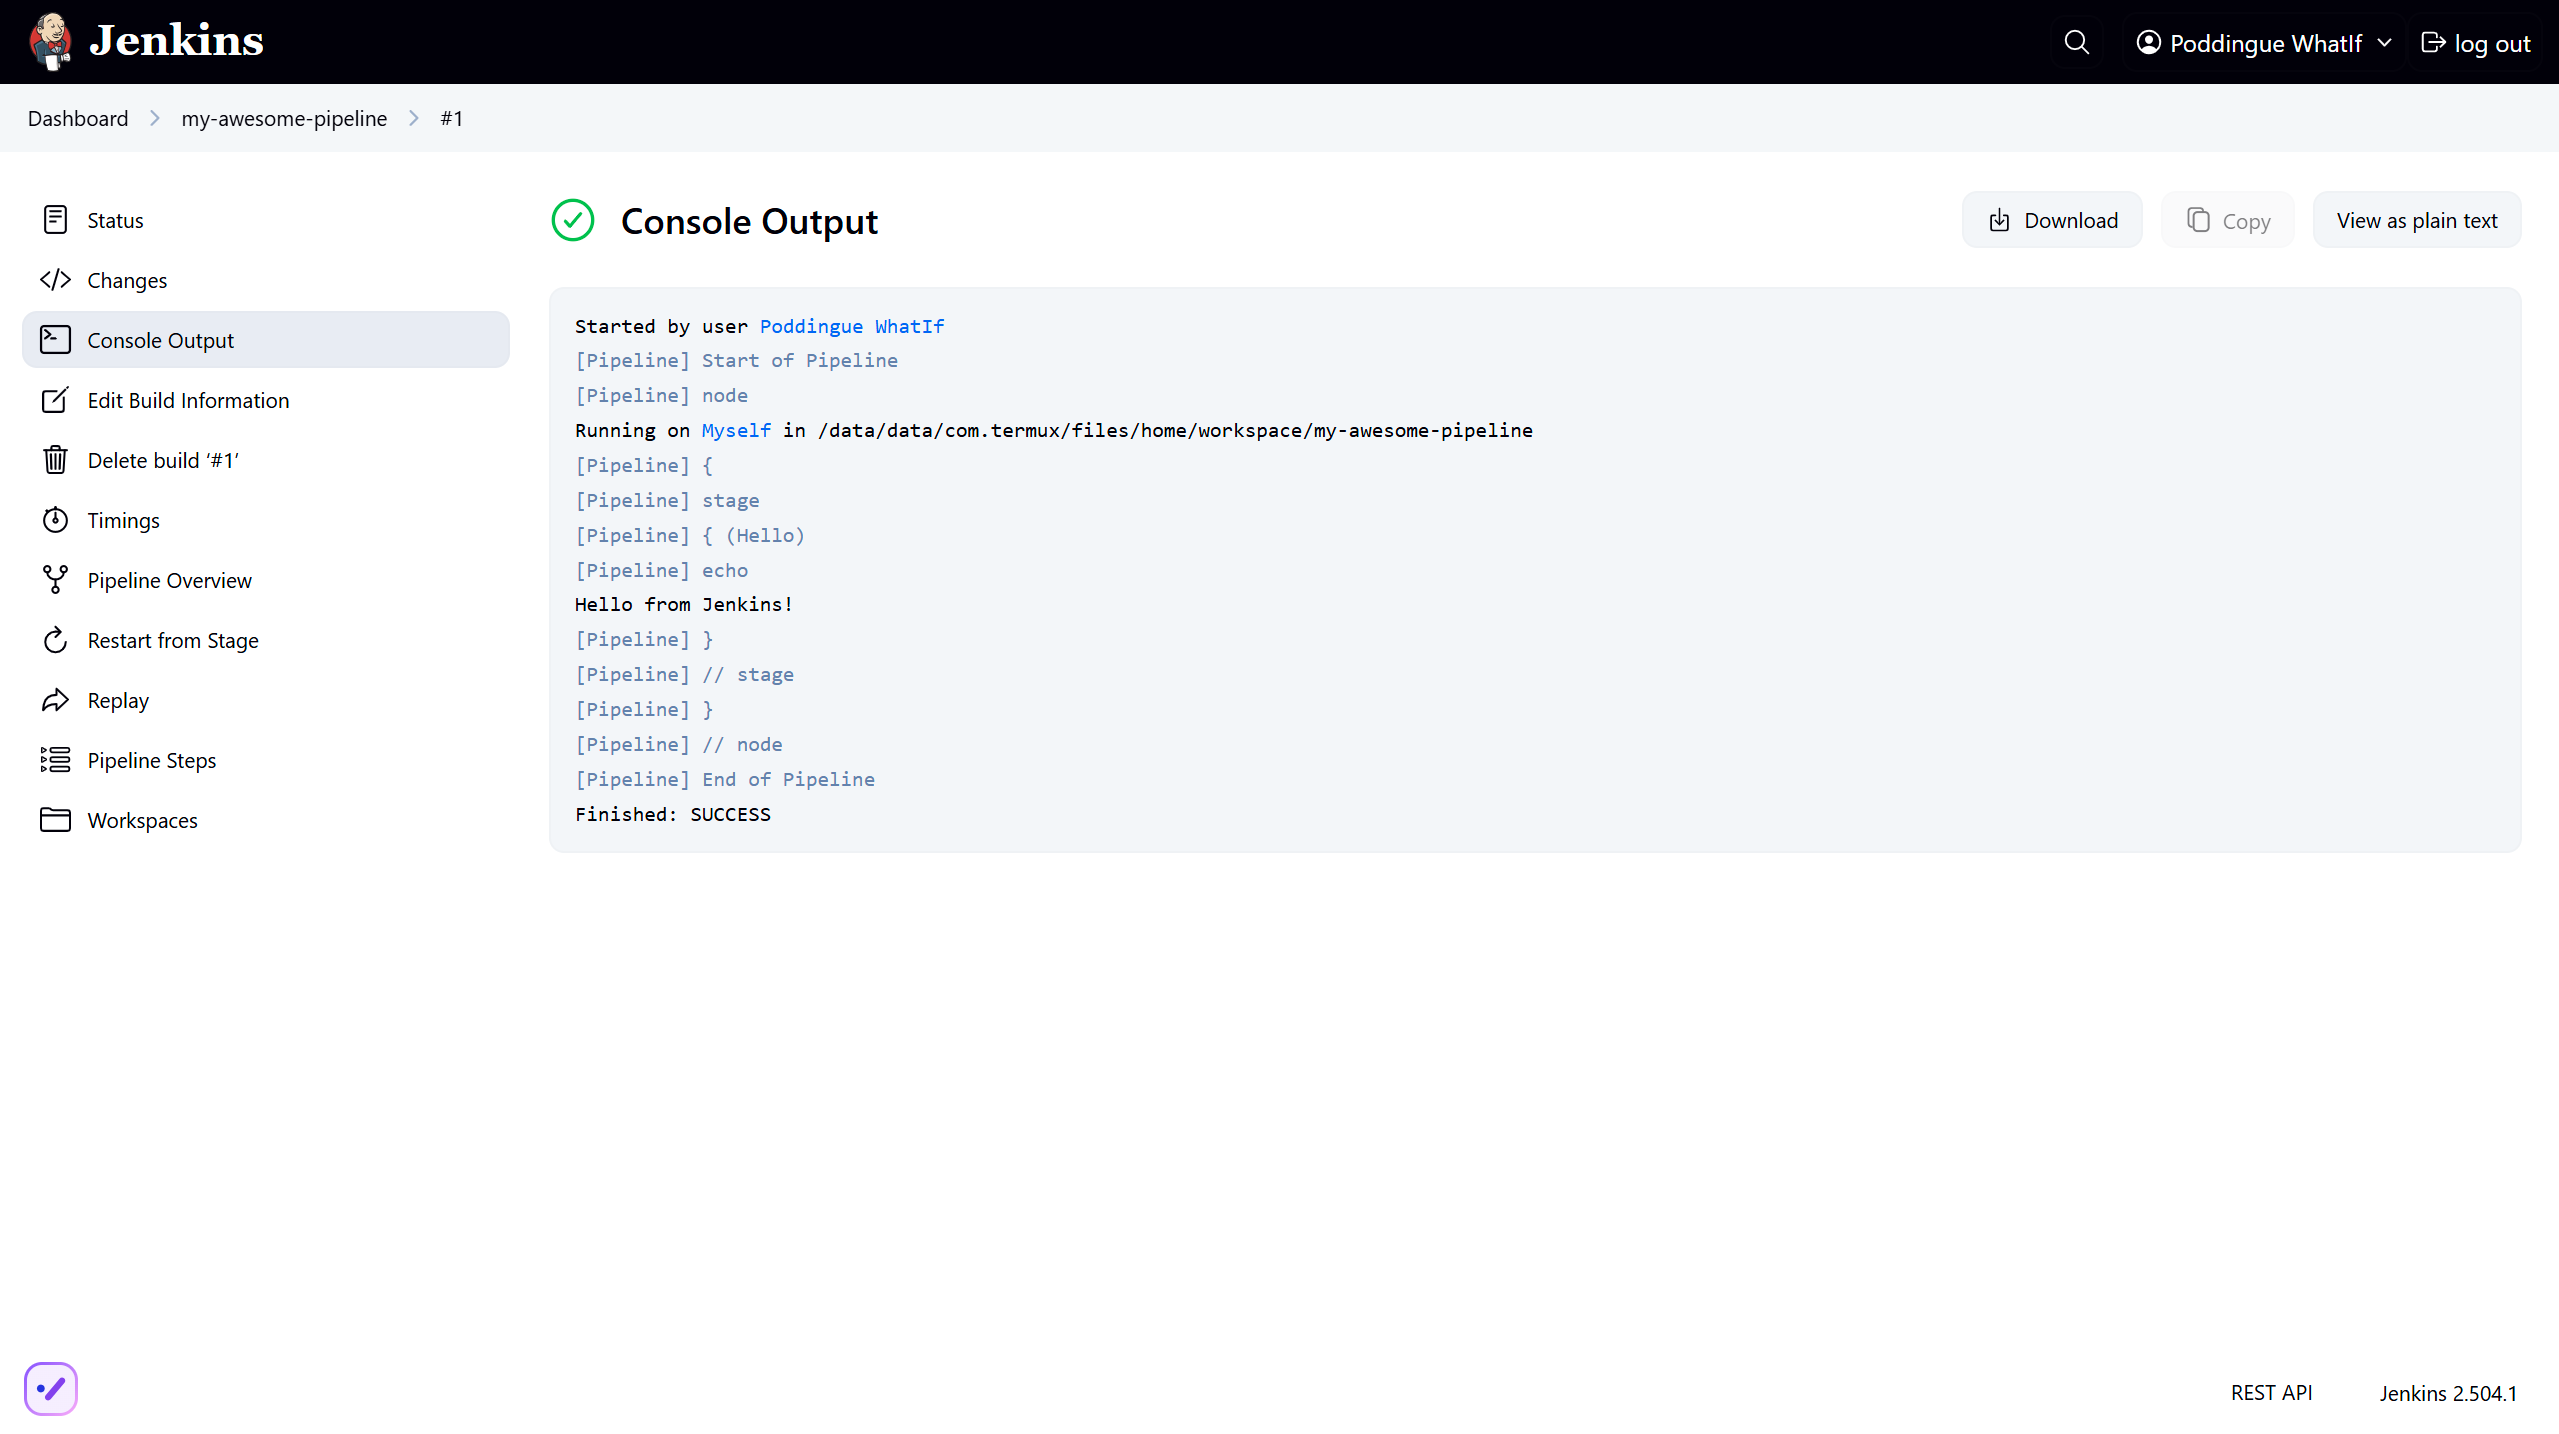
Need quick results? Choose Pipeline script from the Definition dropdown and paste something like this:
pipeline {
    agent any
    stages {
        stage('Hello') {
            steps {
                echo 'Hello from Jenkins!'
            }
        }
    }
}
Hit Save, then Build Now. Jenkins will do its thing — you’ll see a glorious Console Output filled with log lines, warnings, and possibly a tiny existential crisis.
Option 2: Jenkinsfile (Pipeline from SCM)
If you’re playing for keeps, store your pipeline code in your Git repo.
Create a Jenkinsfile at the root (or wherever makes sense), then:
-
Set Definition to Pipeline script from SCM
-
Choose Git as the SCM
-
Enter your GitHub repo URL
-
Set the Script Path (defaults to
Jenkinsfile, orjenkins/Jenkinsfileif it’s nested) -
Save
Now every time Jenkins builds, it’ll grab the latest code and follow the recipe in your Jenkinsfile like a dutiful butler consulting a particularly grumpy cookbook.
Too abstract? Fear not — we’ll now use a real-world-ish example from the friendly folks at the jenkins-docs organization.
Building a real project from GitHub
Confirming Maven’s existence
We already have Java and Maven on board (thanks to our earlier setup). Let’s double-check:
mvn --version

Apache Maven 3.9.9 (8e8579a9e76f7d015ee5ec7bfcdc97d260186937)
Maven home: /data/data/com.termux/files/home/.sdkman/candidates/maven/current
Java version: 21.0.7, vendor: Termux, runtime: /data/data/com.termux/files/usr/lib/jvm/java-21-openjdk
Default locale: en, platform encoding: UTF-8
OS name: "linux", version: "5.4.274-qgki-gfffde3ec8864", arch: "aarch64", family: "unix"
If Maven doesn’t respond, it’s either shy or not installed. Assuming it talks back, you’re good to go.
Creating the tutorial project
Let’s use this GitHub repo: https://github.com/jenkins-docs/simple-java-maven-app
It even includes a Jenkinsfile tucked away in the jenkins/ directory — classy.
pipeline {
    agent any
    options {
        skipStagesAfterUnstable()
    }
    stages {
        stage('Build') {
            steps {
                sh 'mvn -B -DskipTests clean package'
            }
        }
        stage('Test') {
            steps {
                sh 'mvn test'
            }
            post {
                always {
                    junit 'target/surefire-reports/*.xml'
                }
            }
        }
        stage('Deliver') {
            steps {
                sh './jenkins/scripts/deliver.sh'
            }
        }
    }
}
Now, let’s hook that into Jenkins:
-
Select + New Item
-
Name it something like
Maven Project(or go wild) -
Select Pipeline and select OK
In the next window:
-
Select Pipeline on the left
-
In Definition, choose Pipeline script from SCM
-
Set SCM to Git
-
Paste
https://github.com/jenkins-docs/simple-java-maven-appin the Repository URL -
Set Script Path to
jenkins/Jenkinsfile -
Hit Save
And finally — drumroll — select Build Now. Double-check you’re not on a metered connection unless you really want to download half the internet via Maven.
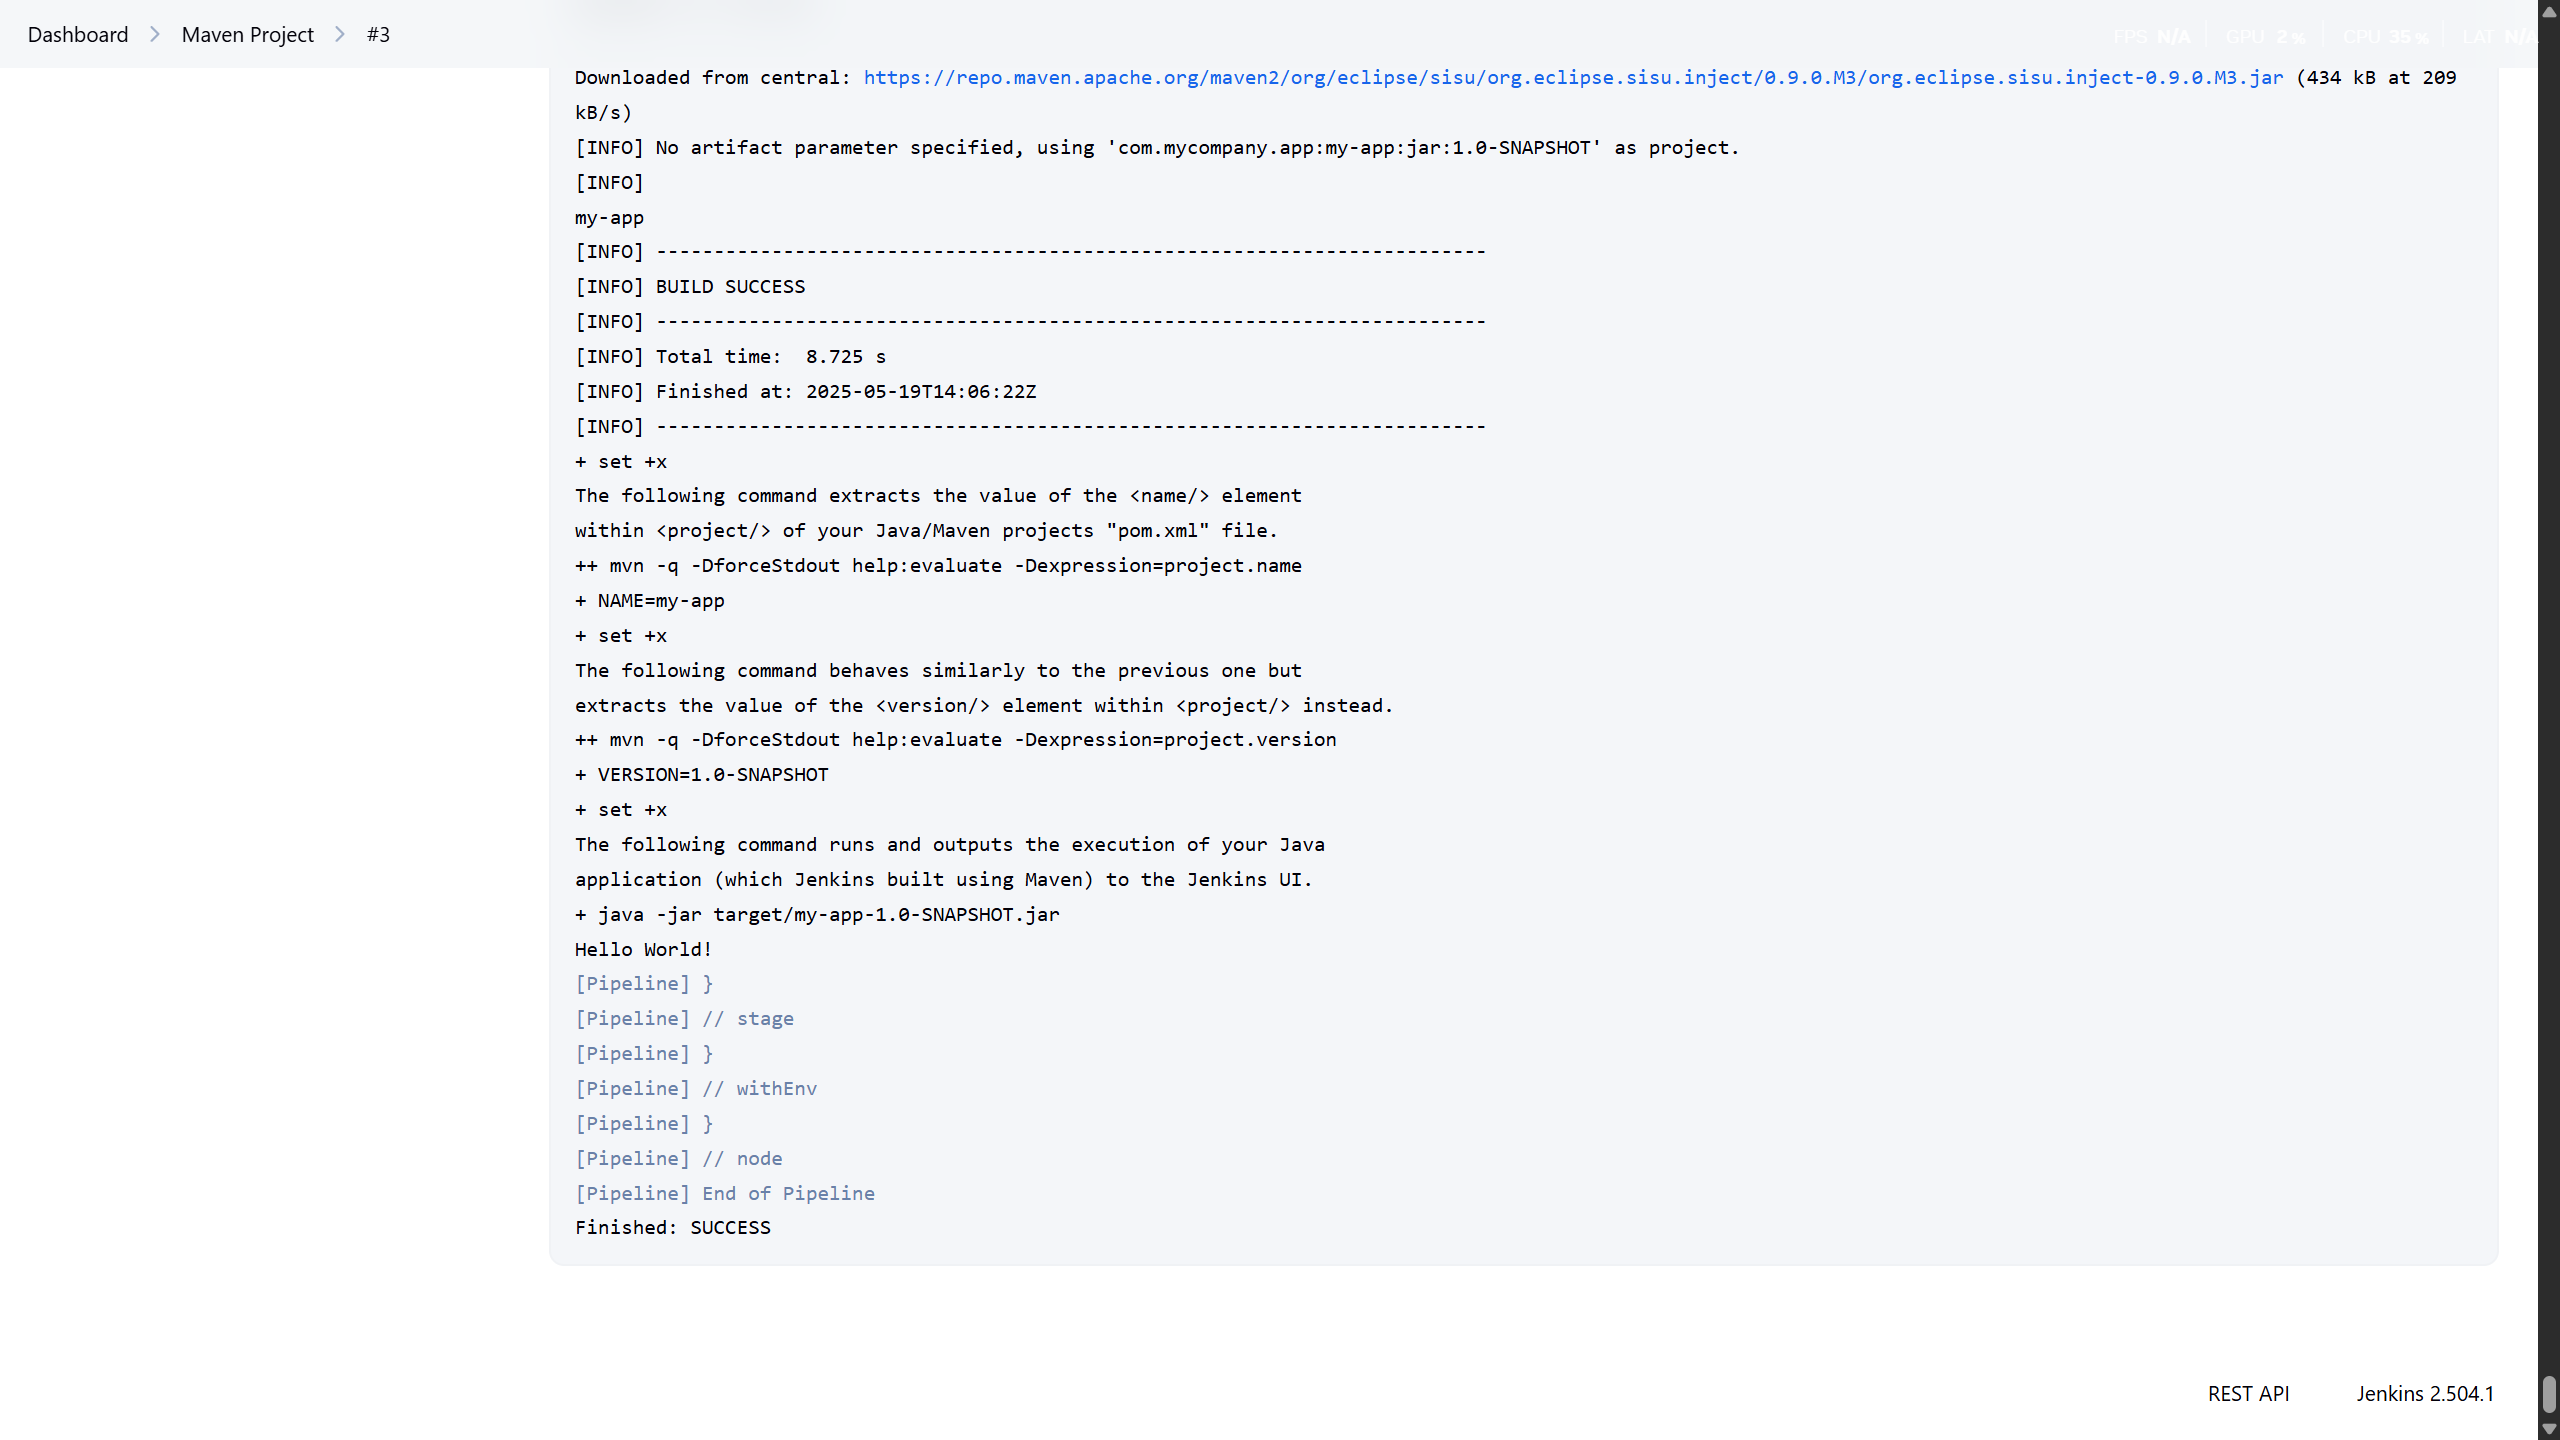
And there you have it! A full Jenkins build triggered from your Android phone, which, let’s be honest, used to spend its days just doomscrolling and charging. High five, mate!
Reflecting on our Pipeline journey
Well done, adventurer! Your Jenkins pipeline is now alive and kicking.
Your phone has turned from a useless paperweight into a superhero for your code. You might not hear applause, but trust us, your future self is silently hero-worshipping you every time a green checkmark appears.
Onward to the next adventure…
If you thought hooking Jenkins to GitHub was fun, just wait.
Next up, maybe we’ll teach Jenkins to brew coffee when the build fails — because caffeine and CI go hand-in-hand, right? Or maybe we’ll set it up to flash the flashlight in Morse code to tell us the build status. The future is weird, and we’re here for it.
Jenkins learning kung-fu? Unlikely. Jenkins writing poetry in YAML? Worryingly plausible. One thing’s for sure: we’ve officially crossed into “I didn’t know I could do that on a phone” territory.
So go ahead, pat yourself on the back (gently — we don’t want to smudge the screen), and rest easy knowing that you’ve wrangled Jenkins into running, building, and deploying from the palm of your hand.
Now close Termux, lock your phone, and whisper to yourself:
"I am the pipeline now."
Until next time, brave tinkerer.
About the authors
Bruno is a father of two, husband of one, geek in denial, beekeeper, permie and a Developer Relations for the Jenkins project.
He’s been tinkering with continuous integration and continuous deployment since 2013, with various products/tools/platforms (Gitlab CI, Circle CI, Travis CI, Shippable, Github Actions, …), mostly for mobile and embedded development.
He’s passionate about embedded platforms, the ARM&RISC-V ecosystems, and Edge Computing.
His main goal is to add FOSS projects and platforms to the ARM&RISC-V architectures, so that they become as boring as X86_64.
He is also the creator of miniJen, the smallest multi-cpu architectures Jenkins instance known to mankind.


Kevin Martens is the Documentation officer for the Jenkins project, helping to lead the Docs SIG and host Jenkins documentation office hours. Although a more "recent" member of the Jenkins community, he has helped create and maintain the Contributor Spotlight, regularly creates the LTS changelog and upgrade guides, and wants to help make Jenkins documentation more accessible to all users.
